Experimenting with design layout.
Monday, 28 August 2017
Pennsic block printing haul - follow up
Remember my block printing haul from Joann's? I've started experimenting with them. The blocks are carved wood with the print surface sealed in a white (oil?) based paint. I had assumed this was the make the carving on the block easier to see for potential buyers but now I've experimented, I can see this has an interesting application. The white paints stops the wood from absorbing any of the paint so it doesn't dry out too quickly. Only a certain amount of paint will adhere to the shiny block reducing buildup concerns. Additionally, with my paintbrush-paint application method, paint collects around the edges of the block resulting in a darker outline for the shape. It could be quite effective if utilised properly.
Sunday, 20 August 2017
First time using a pottery wheel
At Pennsic, I made a thing!!
Under the expert direction of Master Simon I made a howl. I threw it using a foot powered wheel and then it was fired onsite at Pennsic. I tried to decorate it like a 14th Spanish example but the glaze was not really cooperating. So proud of myself. It did develop a crack because the base was a little too thick and it dried slower than the rest of the pot.
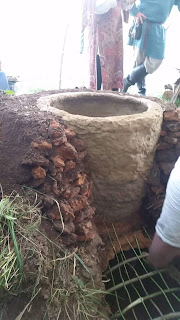
This is the half built woodfired kiln which is constructed onsite from Pennsic clay to fire all the things. :)
Under the expert direction of Master Simon I made a howl. I threw it using a foot powered wheel and then it was fired onsite at Pennsic. I tried to decorate it like a 14th Spanish example but the glaze was not really cooperating. So proud of myself. It did develop a crack because the base was a little too thick and it dried slower than the rest of the pot.
Bottom right - Post throwing; top right - post glazing; left - post firing.
This is the half built woodfired kiln which is constructed onsite from Pennsic clay to fire all the things. :)
Thursday, 10 August 2017
Pennsic block printing haul
As you can tell from the recent flurry of posts, I attended Pennsic again this year. I also took the opportunity to goto Joann's. For those, like me, who reside in Australia, think of it as a cross between Spotlight and Bunnings for crafty things. Unlike Spotlight, Joann's store space is mostly taken up by craft supplies rather than home decorating items. I couldn't resist acquiring some cheap supplies for my block printing quest even though I was nearly at my baggage limit.
The haul includes 7 blocks - the three loose ones I got from a stall in Pennsic proper. I'm a little dubious about the pinkish rubber stamp as it's designed for ink/cards. I worry it won't be able to carry enough paint to be able to depict the fine details. If I thin the paint, it's likely to run into the fabric so it'll take some careful experimentation.
I also bought a rainbow of fabric paint colours. These were especially awesome, as I'm finding it hard to source a range of fabric paint colours in Australia. I decided to go with small bottles as the bigger bottles put my weight limit at risk.
Stay tuned for experimental updates!
Wednesday, 9 August 2017
Lino block printing - initial experiments
*NB: this post has been set to publish itself two weeks after writing as it relates to gifts for people.
This pirate fox fabric is for Ceara. I think it fits nicely with her fencing and love of foxes. I hope she likes it.
More details, and early learnings on my next update!
This week I've been teaching myself how to carve lino and block print fabric. I've been using 15x15cm pseudo-lino squares for my initial trials. My local art store didn't stock lino or lino substitutes however Officeworks will allow you to order them for next day pick up. Each square costs $6.50 which isn't too bad. I've also bought a 5 pack of basic carving tools, a V, two U shapes and two different straight blades for $10 from the craft-store.
I started with flowers because a) organic shapes are easier to hide mistakes on and b) i needed a Hawaiian print viking dress and had no Hawaiian fabric.
The blue rubber is pretty easy to carve and doesn't have a grain so you can make smooth circular shapes quite easily. I've mostly used the V tool for the lines, and the U tools for carving away waste. I quickly realised that since I hadn't bought a roller and my previous sponge experiments didn't work well, I was going to have to paint the paint onto the lino before printing. It's a bit tedious and can be stripy but in a pinch, it works. I also learned to cut away as much of the waste as I could to remove the possibility of accidental printing around the edges.
More details, and early learnings on my next update!
Subscribe to:
Comments (Atom)


