I haven't posted in a long while due to a combination of crazy work hours, limited internet and a phone (camera) that's on the fritz. One major change in the last month is I've been housebound recovering from major organ surgery. As a result, I've had plenty of time to tackle my unfortunate collection UnFinished Objects. I've managed to clear at least one Australia Post tub of items. I'm pretty proud of this spring clean.
Showing posts with label Costume. Show all posts
Showing posts with label Costume. Show all posts
Thursday, 15 November 2018
Tuesday, 26 April 2016
Pelican outfit #3 - Cloud collar patterning
I've started work on the cloud collar. First step was getting the dress (mostly) right so I knew the collar opening and shoulder dimensions. To work out the neck line I simply sewed the dress front and back together then lay the resulting collar shape over some scrap paper to sketch out the neckline.
This next step involved sketching various designs from period references before drafting the cloud collar pattern onto paper. While I am referring to my two primary images from the previous post, I'm also using some of Miriam's research. She kindly sent me PDF's of her complied images which have been extracted from a variety of manuscripts. Her focus is on the Persian examples of cloud collars while I'm trying to look at the Timurid / Persian / Chinese influence on the garb of the Indians of the Mughal. You can see from my previous posts regarding the range of garb the Indians wore (including venetian dresses) that the fashion forward ladies of the Mughal Empire were likely to adopt a variety of designs.
The shape of the collars in the Indian reference is very similar to the Persian examples so given the huge collection of Persian images I find myself in possession of, I've based the shape on them.
To get the shape I took my neckline sketch, I folded it, refolded it and folded it some more until I could get each of the lobes symmetrical. They also had to fit the scrap of silk I'll be using for my test outfit #3.

Evolution of the back shape. When I decided I had cut away too much paper, I sticky taped another section on and extended out that part as you can see is occurring on the left from the middle down.

Once I had my shapes, I cut out a whole collar to see what it'd look like around my neck. Being paper it didn't drape well and I couldn't tell if it was right so I cut it out of yellow fabric and pinned it to the toile I discussed in the previous post. I knew I was on the right track because it looked like some of the out of period collars I'd managed to google.


I took the plunge and appliqued this one once I assured myself the neckline matched up and the lobes on the shoulders worked. I need to practice applique with the machine or do it by hand for the final one because even though I covered the thing in pins, I still managed to buckle some of it. I think more, smaller pins and a sharper, thinner sewing machine needle might be the first step. I could also leave some lines of embroidery with which to sew the applique down onto the dress with to help avoid buckling. Maybe a line around the outside? Hand sewing is never as tight as machine sewing and I'm quite worried about messing up with my embroidered collar. I'm going to have to practice a lot!
I'm not sure I like the wider front and narrower back, I'll have to decide if having the shoulders off set from the seam is such a bad thing, or maybe I can just alter the lobe without changing the front. The shoulder lobes wouldn't be symmetrical then but it'd allow the front to become narrow. I may line the toile just to see how much of the front I'll lose to the seam and see if that fixes the problem.
Either way - pattern 95% done!
Monday, 25 April 2016
Pelican outfit #2 - Patterning the coat
Now I've determined I'm going to make a fitted coat in the Indian style, the trick is to pattern it. Given that patterning typically takes more than one person, and I am reasonably deficient in the sewing skills department I decided to hunt through the commercial patterns to see if there was anything I could adapt to suit my needs.
I came across two potentially viable options. The first seemed perfect for a Persian coat given that it was loosly fitted, with long sleeves and designed to clasp under the breast. Closer examination of the pattern though shows very little shaping in the design and the toile would be difficult to adjust to follow my curves. There isn't a bust line seam so any shaping would have to come from the side seams, which would just end up pulling on the clasp making the coat look ill fitting and me look too busty. I get that enough as it is.


I came across two potentially viable options. The first seemed perfect for a Persian coat given that it was loosly fitted, with long sleeves and designed to clasp under the breast. Closer examination of the pattern though shows very little shaping in the design and the toile would be difficult to adjust to follow my curves. There isn't a bust line seam so any shaping would have to come from the side seams, which would just end up pulling on the clasp making the coat look ill fitting and me look too busty. I get that enough as it is.

Pattern number two is probably the jackpot. It has centre bust seams which I can use to fit the dress. It has an optional upright collar which can be seen in some of the Persian dress examples. The downside to this pattern is I'm going to have to design my own sleeve template because I do not want puffy shoulders. This is a major downside because sleeves have been my biggest fail in the past. The other adjustment I'll need to make to this pattern is flair it more over my hips and lengthen the design.

This pattern luckily comes with a "lengthen or shorten here" line along the waist so I have a good idea of where to start my flair from. For my first toile I used 90cm wide black, mid-weight cotton I had lying around. I don't tend to keep calico in my stash and I find black shows up chalk marks much better than most colours. The downside to black is the photos don't turn out all that well. I laid out the pattern pieces and continued the line of the final 25 cm of pattern down to the full length of the fabric. I then sewed the pieces together (minus the arms) with the widest stitch possible making sure I remembered not to double back on my stitches at the start and end.
To fit the pattern I pinned the front closed and pinched each seam around my waist and under my breasts and stuck a pin in. I used white chalk to mark the peak of my breasts, hips, bottom and my nautral waist. I then unpinned the front and chalked a line to connect the pins smoothly to the sewn seams retaining the points of flair around the hips and bust and smoothly curving into the waist. The waist came in about 6cm all up and the under-bust came in 3cm on each side. I also made sure to smoothly curve the side back seams up to my shoulder blades as I've been ruined outfits in the past by neglecting to fit the back right. The most important part of the fitting was getting the shoulders to sit right. Until I made a dress for Tamar's wedding I never realised that this was a thing. I guess I hadn't given much thought to the different shapes of shoulders given I'm usually wrestling with a non-standard bust to ribcage ratio.
Once I had the fitting lines, I sewed them up with a tighter stitch and trimmed away the excess fabric. Once I was sure I had the fit right, I unpicked the side seams so I could lay the dress flat and trace the neckline for the cloud collar.
During my first trial I decided that the coat was a little too tight around the upper thighs and if I make it any longer I may have trouble walking. The images of both the Indian and Persian coats show plenty of fabric in the skirt so I decided to make another toile with greater flair from the hips. This one I've made out of a dark blue brocade. It's not really a toile, more of an experimental garment. I'll trial a non-embroidered silk cloud collar on it and attempt to line it as well.
In the mean time, here's my first toile with my first attempt at a cloud collar pinned to it. The hem is a little jagged due to my ad-hoc lengthening method but I'm reasonably happy with the waist and chest fit. I'm pretty sure it won't pull on the buttons or clasps in a terrible way.

The collar didn't work as well as I planned so I decided to tackle the sleeves next. I ran out of scraps of black of an appropriate size so I used some maroon cotton I had left over from an experiment with Roman garb I did about 5 years ago. I used the maroon as sleeves and may use it to line the brocade test garment. Anyhoo, I'm not so good with sleeves as mentioned but I think I've worked out some of the secretes and I present my sleeve pattern. Please note this is a half sleeve pattern as the left side is designed to be placed along a fabric fold.

A is the crest of the shoulder. It is possible to the top line A-B more of a sinusoid (as shown in red). The greater the depth of the sinusoid, the greater the angle of the arm. If you do not have a sinusoid or a curve, the arm will sit square like the classic T-tunic shape. Most female garments have some sinusoid to the arm in modern clothing. Having the arm inset at an angle cuts down in excess fabric in the arm pit however it does mean if you need to lift your arms above that angle you'll be lifting the whole outfit. I especially hate this feature of womens reflective work shirts so I've decided to keep the curve to a minimum.
B is the armpit. You could use a rectangle and have a gore but since I have fabric to burn, little desire to sew more seams than necessary AND I know the Indian tailors of old were experts at seams and fitting, I've decided to go with a tapered shape.
The line A-B is the measured distance along the inside of the dress sleeve. I'll increase this distance slightly by adding the curve but that's negligible and will sort itself out during sewing.
A-C is the length of the sleeve. In this case the sleeve reaches to my inner elbow. This length seems to be a common feature in Indian art but was truthfully dictated by the size of the fabric scrap I used to trial the arms.
I couldn't complete the arms until the final cloud collar design had been appliqued on but here's how they turned out.

You can see the final shoulder seam is sitting too far below the point of my shoulder and there's excess fabric in my armpit. I should be able to resolve both of these problems by bringing the seam back to the point of the shoulder. I will experiment with this further on the blue brocade test dress.
In the mean time, now it's appliqued, I can probably do some cheater mc-fee modern finishing touches, like a sewn rolled hem on the sleeves, over locking on all the seams, a placket down the front and a commercial frog or three and turn this into a plain but nice modern summer coat.
Sunday, 24 April 2016
Pelican outfit #1 - designing the coat
Goal: Make a new and beautiful outfit for my Pelican Ceremony
Target: One new outer coat (silk) with embroidered cloud collar, one new dress and one new under dress possibly also from silk.
Additional extras: Shoes, Hat, Belt
Project completion date: Great Northern War 18 (7 weeks)
Project breakdown:
Outer coat patterning: 2 night
Outer coat construction: 5 night
Cloud collar patterning: 1 night
Cloud collar embroidery: 14 nights
Coat buttons: 7 nights
Dress patterning & construction: 3 nights
Under dress patterning & construction: 3 nights
Optional:
Shoe decoration
Hat design & construction
Veil sewing & construction
Step 1 - Patterning the coat
I'm starting from the outside in on this project. This is probably the wrong way to do it because coats and jackets should be fitted over under garments however given the time frame required to complete the embroidery on the collar to my satisfaction I have to have the collar dimensions early on in this project, which means having the dimensions of the outerwear as well.
I've read some sections of Royal Mughal Ladies and their Contributions by Soma Mukherjee (2001, ISBN - 81-212-0760-6). While I can't agree with some of the statements (such as Indian women didn't wear sewn upper body coverings), some of the quoted primary references are very useful. I've used the following quotes as a basis for the language I'll use in the following posts.
Mukherjee (2001) states that the Mughal women wore the following:
- A pair of hollow cups or cases which is made of linen, passes under the arm and ties at the back (Choli top or bra?). "The bodice were brocade lined with pearls". It is not clear if this is the choli top or a separate garment.
- Half smock made of fine cotton or silk (sometimes)
- Trousers tied at the waist which became tighter around the lower leg and ankles over the years
- Jagulfi - An empire style gown that fastens at the neck and waist to allow a glimpse of the breast, with long sleeves that extend past the hand (under dress)
- A short under petticoat, slit to the waist, below the jacket.
So what does this look like? The woman pictured below wears a short sleeved button up coat with cloud collar under which is worn a underdress with nearly transparent sleeves. A slight hint of red suggests another skirt or dress worn under the coat.

Portrait of a Woman, Iran, mid 16th century. The Met Museum, accession number: 52.20.6
Many of the Persian images appear to show women dressed in loose fitting clothing giving them a long, slender look as opposed to the more Indian lean and curvacious body type. I believe this is stylistic rather than a comment on the fashion of the time. Examinination of some portraits indicate bunching under the breasts which suggests the garment has been fitted to the curves of the wearer.

The Indian image I'm favoring most heavily is one of Indian women wearing Persian/Tamurid garb. In this image the women wear coats (with cloud collars) that are closely fitted to their bodies with a significant amount of fabric flaring from the hips. Under the coat they wear a dress with long tight sleeves that appears to either button (green) or lace (pink) up. The yellow bunched cuffs worn by the lady in red/green indicate there may be a second finer under dress.

Detail: Babur seeks his grandmothers advice. India, 1590-1592. Morgan Museum, MS M.458.18

In summary: I'll be making a fitted dress with a counter colour cloud collar. The cloud collar will be embroidered and then appliqued onto the garment. I will also construct an underdress with long, well fitted sleeves, and possibly a long over dress to go over this. I will either make pants or use a pair already in my possession. My first task is patterning the coat so it fits my curves well and so I can get started on the embroidery of the cloud collar.
Sunday, 3 April 2016
Remaking the blue dress - Step 3

I've removed all the hooks and eyes except the two on the waist band. You can see the damage done to the inside of the fabric from the threads in the pic above. I've replaced all the hooks and eyes with lacing rings. I initially had trouble working out how to do this. I had thought of winding my own rings but then I realised if I just butted the ends closed, they'd rotate and pull through the securing threads eventually, or since they are always a little rough, eat through the lacing cord. I then considered soldering a bunch of loops together but it'd be labour intensive, and again, i'd probably end up with rough sections which wouldn't bode will for the long term viability of this dress. I asked around to see where other people source lacing rings. Turns out there's two good options 1) buy them from a medieval retailer who is usually at GNW and Festival for an exorbitant price OR go to my local fishing shop and buy them in packs of 10. This turned out to be a bonus for me because they were having a closing sale so I got two packs for $8.
Not-so-pro tip: Buy lacing rings at your local fishing tackle store and save a bunch!
I haven't tried it on yet as I'm still making the cord I'll use with this dress. I may need to add extra loops if these are too far apart. This was a pretty easy thing to get of my things to do list once I'd actually gotten the rings.
Friday, 22 January 2016
Remaking the blue dress - Step 1 & 2

Plotting at Great Northern War (2013?)
I've had my blue linen dress for a couple of years. I made it last minute for a tourney and feast in Atlantia. One thing I've always disliked about the dress is the hem was tacked up and contains at least 30cm of additional fabric. While this helps the drape quite a bit, it makes the skirt quite weighty. I also used hooks and eyes as fastenings, which are reasonably unobtrusive against a white chemise but they're not period. They're the good hooks and eyes with the little kink which means they don't pop open but still. Also, the fit isn't quite right. It doesn't hurt my back like my last blue linen dress but the arm holes are slightly too tight and my bust has changed since creation. Lace around a chamise should not be a requirement of wearing a dress.
I considered remaking this dress for Krae Glas's Ehrentag 2015 event but I gave up on the idea because I ran out of time as per usual. Instead of rushing through the remake, I'm going to take my time and hopefully end up with a late period dress I can be happy with. My first task is to fix the hem that's been bothering me for so long.
Task two, find a period reference as inspiration.

Domenico Ghirlandao, Birth of St John the Baptist 1486-90 Cappella Tornabuoni, Santa Maria Novella, Florence
I started the remake by finding something similar in some extant art (above). The reference had to fit the basic features of the current dress - circular neckline, cartridge pleated skirt which starts at the natural waistline and no/detachable sleeves. Thus the new dress will be patterned on late 15th century Italian fashions.

The dress in 15th century Italian, is called a gamurra. There is a nice collection of similar images on a blog called Sophie Stitches. It looks like the come in a range of colours, with or without sleeves which may or may not match the main colour. The dress appears to lace up the front or at the sides. Removing the hooks and eyes and replacing them with a more period approach will be my next step.
Friday, 15 January 2016
Venitian dresses in India?

Anne de Wilde's elevation dress.
A friend of mine has been making an elevation dress for Canterbury Faire this year and has been sharing the construction on facebook. It is a lovely Venitian dress inspired by this image, a lady from the 1600's. When she posted the finished dress I was interested by the fact the main body of the dress ends below the breasts which are covered by a plain or decorated partlet. There is a whole section of images of these dresses here. Apart from being a beautiful dress which has taken her hours to construct, it also reminded me of an interesting image I'd found when browsing the collection in the Met Museum. The image below featured in one of my classes on indian choli tops. I was fascinated by the contrast in garb between the central figure and the ladies on the left looking on. I was quite taken with the European garb combined with the indian veils etc. I had thought the European garb was Elizabethian garb depicted in such a way that still displayed the ladies breasts for some sort of symbolic reason. Now I'm not so sure.
The ladies could quite well be wearing complete Venetian dresses. Even better, if you examine the center lady in pink, there appears to be some pinkish gathers coming from her neck and the lady in purple on the far left also seems to be sporting a neckline of some sort. Is it possible that this manuscript also shows light weight, solid colour fabrics as transparent? This would fit with other images I've seen of more traditionally dressed indian ladies wearing light fabrics depicted as a wash over the womens body or a halo behind it so the breasts and upper body can still be seen.
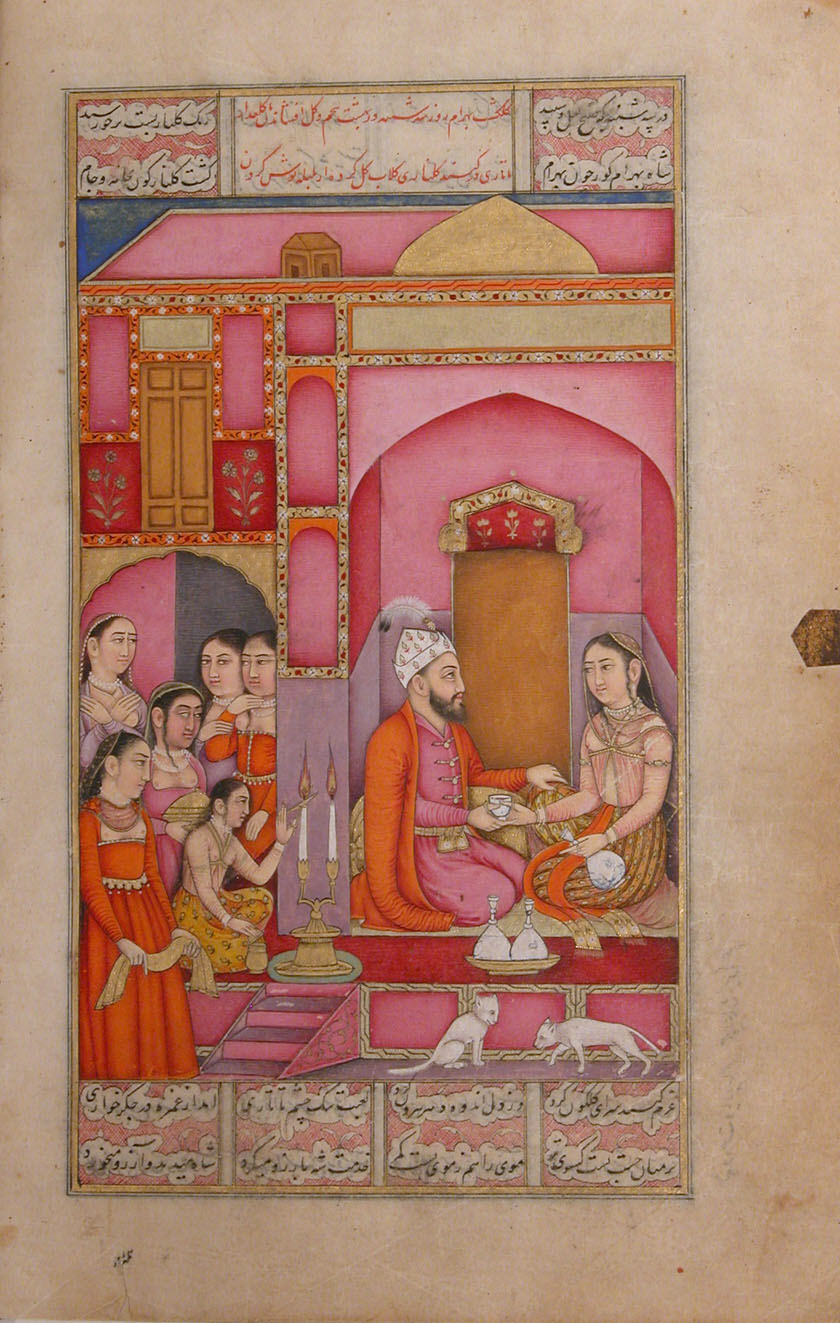
17th century manuscript depicting Amir Khusrau Dihlavi (1253–1325).
Given my other research interests at the moment my next step will be to examine the bottle in the central figures hand as well as any other time frame indicators in this and associate images and see if I can nail down the reason for the dresses. Are they contempory to the time of painting (was there a Ventian influence?) or are they from a period before the manuscript was painted?
Friday, 26 December 2014
Schoodie / Squoodie
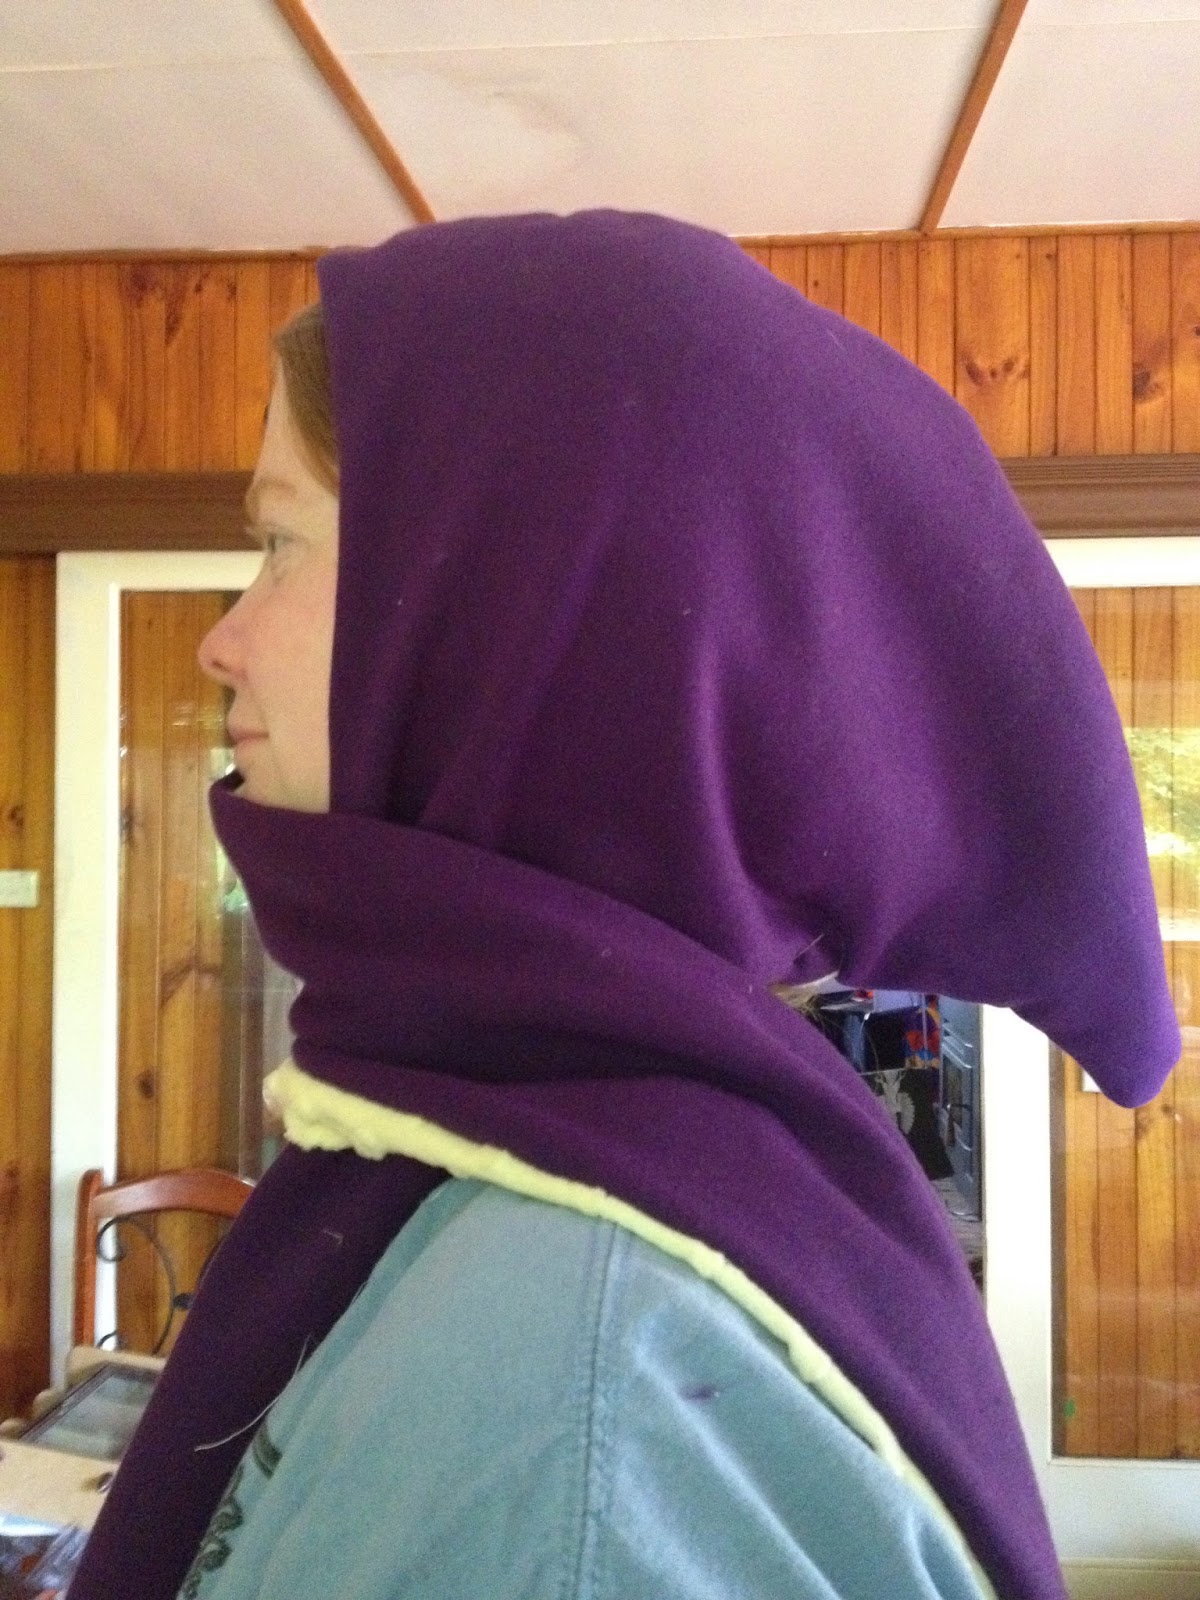
Schoodie - a combination scarf / hoodie
Squoodie - a combination scarf / hoodie with a squid theme
So, I didn't know schoodies were a thing until I went to Tobin's November Stitch and Bitch day. Apparently they are and my favorite Youtube channel, Threadbanger, has even done a short instructional video on how to make one out of an old sweatshirt (jumper) here. Tobin kindly lent me his pattern which he seems to have printed off the internets. I'm not sure where he got it but this seems like a rather simple three piece pattern which I may make next time. You can also get a ton of free patterns for knit or crochet patterns for scoodies simply by googling it.
I made the schoodies in November as a gift for my man who's currently contracted out to work in the sandbox. As it's winter over there (a cold Christmas - what a barbaric idea!), I thought I'd make him something to keep him warm. I scheduled this to auto-post after Christmas so as not to ruin the surprise!
To make - follow these helpful instructions on Indie Tutes OR:

(pattern shown here is schoodie (with ears) not Squoodie)
1. Cut out your fabric.
Make sure you have 2x outer-shell, 2x inner-shell, 2x outer pocket pieces, 2x inner-pocket pieces cut in opposite directions.
When cutting the fabric be aware of the grain. Like fur, my bumpy fabric for the liner has a grain so I had to ensure that the pattern was cut to ensure the grain went down the tentacle. This means I needed 1.2m of liner fabric but only about 0.7m of outer shell.

I elongated the outer-shell of the hoodie to create the hood shape. I left the inner-shell according to pattern to ensure the hood wouldn't slip over my mans face.

2. Pin the pockets rightside to right side and sew along top.
I decided to use the non-fluffy side of my fleece as the good or right side of the fabric so I pinned the non-fluffy side of the purple fabric to the fluffy side of the cream.

3. Turn over the pockets and pin along top to hold in place (if using cottons, you can iron the seam to hold it flat)
4. Pin pocket pieces in.
Pin in such a way that you can't see the colour difference (when you're done sewing this results in colour matching the pockets to the tentacles)

5. Start pinning squoodie together from the center front seam (right sides together)
Use ALOT of pins! I used pins ever inch or so. Fabric with nap like fur tends to slide on the fabric and will stretch and bunch if you're not careful. If you have one (which I don't) a walking foot may help

6. Sew
Sew from the center back along one tentacle.
At this point I decided I wanted to have a slight taper before the pockets to create more of a tentacle shape. I drew it in with water erasable fabric marker and sewed along the line
Keep sewing until you reach almost to the back again. Leave a hand sized gap.

7. Pull through and flatten.
DO NOT freak out if you end up with one pocket on the inside and one on the outside, simply pop the point back through and move the pocket to the side you want (your hood is actually fully reversible yay!)
8. Hand sew gap closed (or machine if you've got time restrictions and don't mind a weird seam at the back)
Adaptions:
I elongated the original hood to make a squid look. By sewing in a tight angle at the center back of the hood between the lining and the outer-shell I pinched the fabric in such a way that pulled the hood down to rest in an appropriate manner.
I considered sewing squid-eyes onto the hood but I didn't want to make it too cutesy.
If you can't find bumpy fabric like mine, consider appliqueing suckers onto the inner-shell tentacles.
If you're using fleece, you could add a quarter circle of fleece to drape out of the back of the hood. The fleece won't fray and you can slice it into tentacle shapes. Make sure this is sewn in so the stretch direction is down along the tentacles. Pull the tentacles to make them curl along the edges a little to hide the rawness.
It'd be entirely possible to elongate the hood to an extreme lire-pipe length for a pixie look.
Ears can be hand-sewn separately onto the hood, rounded ones for bears or pointy ones for a fox/dog.
Paw prints could be added to the outside of the pockets prior to sewing them in.
Sunday, 16 November 2014
Southern Belle dress diary - part 6

Final steps:
Friday, and I flew up to Brisbane around lunchtime. This meant leaving the house at 8am in order to trek to the airport in time to ensure I got my flight. Since 9/11 airport security has theoretically been more stringent, but I managed to get my sewing kit (sans scissors) on board so I was able to work on small bits during the two hour flight.

I had thoughtfully prepared for the flight by sewing up some strips of the blue silk stuff. I didn't really have any clear concept about what I wanted to achieve with them so I bundled them, some pearls and some lace into my handbag and figured I'll work it out on the flight. Work it out I did! I decided to make some rosettes which I could then use to embellish the dress. (Go here for a quick and dirty how to). The rosettes were the last things added to the dress. Originally they were going to be placed along the blue trim helping distract from any potential lumpiness. The problem with this was that I'd have to put on the corset and the dress in order to get the placement of the 8 rosettes right. I really didn't want them on the peaks of my breasts because they stick out enough already thanks to the corset. Given they were sewed on around 1am on Saturday morning, I placed them at the base of the strips and at strategic places along the waistline. I didn't get time to make the sash I wanted so these rosettes helped tie the dark ruffle to the trim along the bodice.
On the subject of trim, this was started on Friday evening while sitting around with Tamar and Sophie. I started by carefully sewing along one edge of the trim so it sat flush with the lace. About halfway along Sophie pointed out that if I used a running stitch down the center and embellished it with pearls it'd hold the trim down, look great AND save me a bunch of time. She's so smart! So I did as she suggested and I'm quite happy with the result.

I added pearls in the center of the rosettes as well to give them more depth. The blue trim ran next to the piping which terminated in the upper sleeve zone. I decided to run the lace and the trim along the top edge of the sleeve as I wouldn't get time to sew a sleeve on and I needed to clean up the edge. Rather than running the trim down the back of the dress I decided to terminate it at the shoulder blade where the back piping started. I gathered the spare trim in and created rosettes around the final pearl. It gives it a little extra something and ties to the rosette at the bottom of the piping. As a last minute idea I'm really quite pleased with how it turned out!

To complete the outfit I wore my elbow length cream gloves, a pearl necklace and pearl earrings. I used ideas from this youtube Southern Belle hair style tutorial and put my curled up hair through a doughnut which I then covered with the strands. I then wrapped two side plaits around the bun and tied the curls off on one side with leftover blue trim. I used one of the leftover rosettes to pin a random curl on the other side and borrowed a pearl pin from Tamar to hold it down. Below is a picture taken by Leisel of Tamar and I. Tamar is also wearing a corset under her lovely card-dealers outfit.

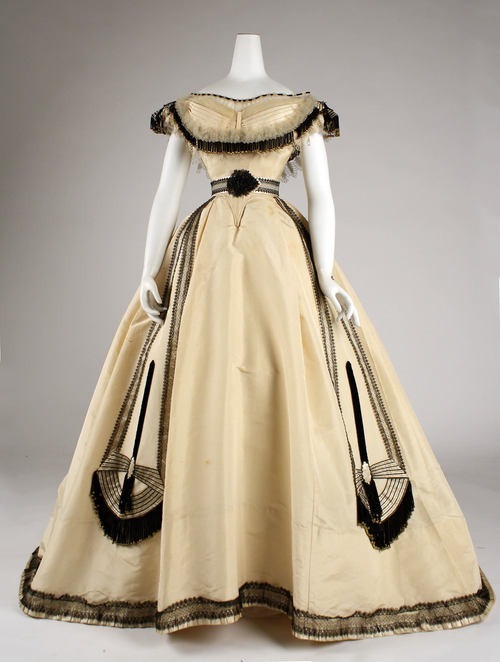
Once I got to the party, someone mentioned there actually was a date on the newsletter we were sent - Octber 20, 1874. Well, I missed the dress date by about 15 years and the whole bell shape -> bustle thing as well. I did get the biggest compliment from Carolyn though. I've always admired her SCA garb and I know she does Victorian costuming as well. She had posted an image of her petticoat while I was wrestling with the tulle, and it was lovely! She said I looked like I was wearing my great grandmothers dress and she even knew it was 1860's! In my head - "NAILED IT!".
Things I might still do:
Remove rosettes and reposition
Make tie shaped sash
Lace along ruffle to stop it being such a solid block of colour (it's sort of lost in the gloom at my feet)
Sleeves, possibly puffed, possibly with lace or pearl trim.
Thursday, 13 November 2014
Southern Belle dress diary - part 5
Today was epic! Mostly because my deadline is fast approaching and I fly out to Brisbane on Friday. As a result I pretty much spent all of today on this dress (including staying up all night) and this is going to be quite a long post.


Things still to do:
Hand sew in front panel
Sleeves
Decoration
Belt / sash and peplum
Day dress, 1862, Met Museum - I LOVE the cutouts on the sides
I started by spending a couple of hours pinning and repinning the skirt to determine the appropriate drape. I've now collected a pretty good pinterest collection of reference images. Originally I wanted the bodice and the skirt to be separate pieces like in the image above. Then I realised that the bodice wouldn't sit right without the skirt. The weight of the skirt holds the bodice in place so it doesn't float against the silk corset when I raise my arms. So I decided to attach the skirt to the bodice. I then wanted to retain the point of the bodice as I could fasten it at the waist and let it flare naturally into two points over the bustle. I've found a number of lovely decorative approaches to bustles over the last few days - it's so great having this many extant pieces to choose from!
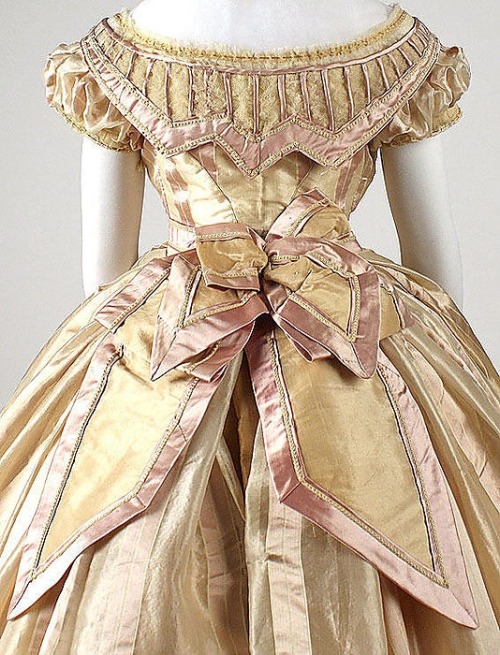
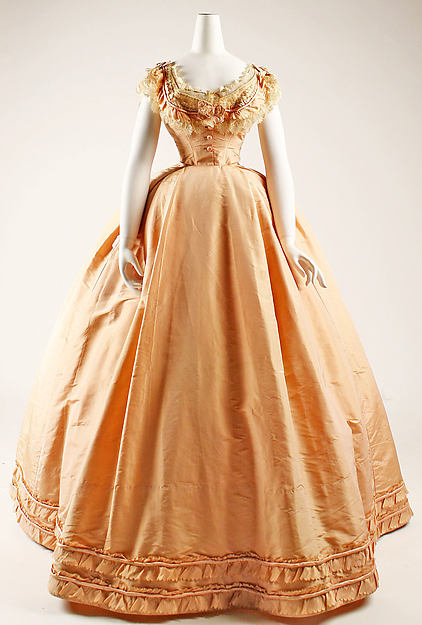
Back detail of cream and blush silk dress - Met Museum, 1865
After playing around with the drape of the skirt I realised I'd have to add a twill tape for the skirt to attach to under the bodice from both sides that'd have to close somehow under the zip/button combination. At that point in the afternoon it went into the too hard basket and after my mother helped me pin and bring in the sides of the bodice I attached the skirt directly to the bodice all around. The V's ended up on my hips.
Emile Pingat ball gown. Met Museum 1860 - I love the black sash detail!
This blue silk dress sold for $444 on ebay in 2012. The seller claims it's 1850-1860's and was donated to some museum and has the accession number: 47.168-2. I just love the stripes and the sash details.
I had draped many different styles, from the smooth bell shape, to one smooth at the front and pleated at the back, to something more gathered. In the end I fell in love with the style above because it just worked with the fabric I had. Below is an image of the skirt tacked to the bodice and experiments with lace in progress.
Once the skirt decisions were made and the bodice and skirt tacked together (with red thread no less!), I had to make some trim decisions as they may or may not need to be sewn in with the skirt and bodice. If you recall earlier in the dress diary I had pinned a blue silk front to the dress in an attempt to hide the pesky lacing loops. While looking for dress designs I had an impossible time trying to document a contrasting panel in the center of the bodice. The closest I got was the image below and I'm pretty sure that's a top wrapped over the dress. Also, due to the wonders of pinterest, I'm really not sure when that image was taken. To my untrained eye it could be 1860, but as I have no other evidence for such a thing I had to abandon the idea.

So without documentation for a full panel I had to document some sort of seam treatment or ribbons or something that'd cover the area in question. So I turned to the trusty internets and found the image below and fell in love with it. I could pretend that it's the justification for the blue-ish silk but I made that decision based on how much fabric I had and the colour rather than any extant dress. So I can use strips of silk to cover the lacing loops.
1865 day dress fringed in teal taffeta trim. Dress has a belt with a large peplum (bustle sort of bow decoration). Whitaker Auctions.
In addition to the silk bodice decoration, I really liked the tie shaped sashes on the Emile Pignat dress (and a few others). So I tried draping it with some spare fabric. The idea is to use the brocade for a majority of the sash and edge it in the blue silk. As the sash is detachable this has been put on the back burner until the dress is completed. The next challange - accomodating the hand length of space now on the base of the skirt.
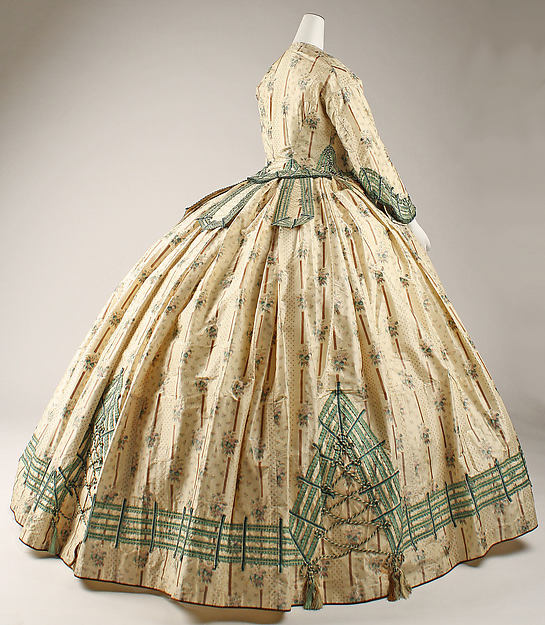
Due to the move from hip to waist and the lift provided by the tulle petticoat and the hoop skirt the hem of the dress has risen about a hand's length. I've measured the base of the skirt at 6m (the waist measurement pre-gathering is 4m). For fabric I have two choices. I have two, 2m pieces of brocade or 12m of very light (artificial?) silk stuff. I could just extend the hem however I can't document same colour, non-ruffled trim (counter-colour is a thing though). I can, however, document a trim at the base of the skirt in a dark contrasting colour (below) AND tie shaped sash things edged with the same colour.

So I experimented. On the left - wide gathered blue trim with upper ruffle and lace, centre - thin gathered blue trim on smooth brocade with small blue ruffle and lace at join and finally - smooth brocade extension panel. I decided to go with a wide blue silk trim and gathered 12 meters to my six. This took me most of the wee hours of the morning as I was so tired I kept screwing up the gathering ratios. My usual method for gathering is to determine the ends of the panel and pin them. Then I pin the middle of the gather and the middle of the panel together. I then sort of squish or expand the gather until it fits. I pin the hell out of it and then sew it down smoothing the gathering as I go. I was rather happy that I didn't do my usual trick of accidentally sewing the base of the trim into the top of the trim. As this took so long I didn't end up attaching the lace - this will be a dress near completion step.
Silk dress, 1864, Met Museum - Very short sleeves with darling lace, simple ruffled trim on skirt and flat waist. I'd feel beautiful wearing thins.
Finally I looked at the possibility of adding ruffles to the neckline as can be seen below. The idea was to make something like the silk dress above and use the ruffles to create the illusion of a broader neckline without having to alter it. Given how high the next was at the bottom and my rather generous chest I decided that adding additional bulk in that region probably wasn't a good idea. Once that decision was made I felt I could sew the bodice, trim and skirt together and complete the final touches on the plane and at Tamar's place.
Things still to do:
Hand sew in front panel
Sleeves
Decoration
Belt / sash and peplum
Wednesday, 12 November 2014
Southern Belle dress diary - part 4
Today I unpicked the entire dress. I've removed the sleeves and separated the skirt, the panniers and petticoat from the bodice. I spent pretty much all day washing the fabric (everything except the tulle). I've also ironed it to try and get most of the creases out. It took forever because I did both the front and the reverse hoping to get it smooth. It's almost there, I'm probably not going to take it further because it'll just collect more when it gets crammed into my baggage so I'll wait until I'm in Queensland until I iron it completly. I've also ironed the 12 meters of blue (artificial?) silk sari that I'll be using for contrasting trim. So much silk-stuff!

The brocade after ironing (left) and before ironing (right) - this is why I went over it two times!
Things done:
Adjust the hoop skirt -
I cut off the waistband of the skirt by cutting off the skirt 8 inches above the top hoop and adding a new waistband made out of random white fabric. As the skirt was originally A-line I needed to gather the fabric in a little. I sewed a straight band to a majority of the skirt and gathered the remainder in the last section before the tie. This pulls against the hoops unevenly, resulting in the hoop sitting closer to the legs and puffing out in the back like so:

Tulle skirt gathered to true waist -
This was a little challenging as both tulle layers had been attached to the bottom of the bodice, as a result it had V shaped dips in the waistband. I started by straight sewing a new 120cm long waistband to the tulle. Given the difference in measurements between my hips and waist and the extra distance added by the V shapes I ended up with a significant overlap. Happily, I could position the frontal V at my front and the two extra 'puff' sections of tulle that used to be for the panniers wrapped around and overlapped at the back giving me better bustle.

I started by over lapping the two sections over each other and attaching three hook and eyes to the side of the waistband. Though this gives me the best bustle, as you can see it's pulling oddly. I tried to fix this by extending the opening all the way down to the ruffled tulle layer but the overlap proved to be too much and was lopsided no matter how I fiddled with it. The bit that under-lapped wouldn't sit flat and kept pulling towards the side with the clips.

In the end I angled the waistband and used three hook and eyes. The extra lengths on each side folded in under the waistband and overlapped themselves like this ><. The fluff of the bustle wasn't as amazing but it sat right so I went with it.
On a side note - I really don't like tulle, it's so easy to catch your scissors on it and tear it.
Work out right drape for fabric
Determine how to extend bodice with brocade
Placement of blue accents and ruffles
Hand sew in front panel
Sleeves
Neckline
Subscribe to:
Posts (Atom)