Showing posts with label Garb. Show all posts

Sunday, 16 February 2020

Chola garb

A copper alloy figure of Parvati, Tamil Nadu, Chola Period, 12th century. Bonhams Auctions, Indian, Himilean and Southeast Asian art sale, item 3074


I've been writing a lot about ceramic recently so I decided to purge my Drafts collection and complete a few posts in the new year. That was all well and good for a whole, three posts until I stumbled upon a reference and down the rabbit hole I went. This Chola statue is so well photographed I thought I'd dedicate a whole post to unravelling it for future use.


Tamil Nadu is located in the southern tip of India. The capital is currently Chennai (previously called Madras). The map above displays the general extent of the Chola Dynasty however it's influence extended far beyond this to Java and beyond. The Chola Dynasty left it's mark in history in many ways, but this posts focus is their acclaimed copper alloy statues of the 12-13th century. One statue in particular for auction at Bonhams is a beautiful example and has some very high resolution images, perfect for the armchair reenactor. All images below will be of this statue unless stated otherwise.


This is what caught my eye first. Are they amazing floral droopy earrings or braids decorated with flowers? The necklaces appear to be multiple individual necklaces stacked upon themselves with a single clasp seen from the back that peeks out from under her curls.

On her arms, she has tied a decorative plaque and a plain, circular armband as well. I originally thought this was one larger cuff but the jewellery on her right arm dips towards each other suggesting they are individual pieces. She also wears multiple bangles and finger rings. Around her ankles, she appears to have little balls, bells or mangos perhaps?

Drape: Parvati wears an assymetric (veshti / vaetti - tamil, or dhoti - sanskrit) drape with one leg wrapped to a few centimeters above the ankle and the other resting gently on the knee. 
 
Depending on your interpretation, you could construct bands of floral patterns with leaves, or alternatively, geometric designs or potentially human torsos. I do like the floral patterns best but interestingly, there are whole flowers in places and halves in others. Th designs don't seem to cross the horizontal stripes. Are these supposed to represent block printing, woven patterns or thin bands of fabric joined together?


The girdle (red) appears to be a wide band slung low over the hips. Three loops on each side progress from just outside the buttcheek (so you dont sit on them) around and connect to the front. The top and the bottom of the girdle are stiff yet flexible. I suspect they are fabric. There is a possibility this is the top edge of the dhoti garment folded over but I doubt it. The girdle seems to be wrapped around the waist, possibly tied, and then secured with a beaded belt. 

The beaded belt appears to be a double set of plaques or beads. At the centre front, and centre back, two larger plaque sections provide and avenue for tightening. The pink loops can be pulled to tighten the cord that runs through the beads. At the front the spare piece of cord or sash is tighten through the top most plaques and the falls to one side (pink). This would suggest that the end plaques on the back have two holes through which the cord / sash is run to prevent the fabric from slipping. The top front fastening could be achieved by running three pieces of fabric through one hole but a double hole would make removing the belt less likely to create a situation in which it'd need to be restrung. I am really going to have to play around with this design to see if my ideas would work!

Monday, 21 October 2019

Princesses MS6613


I had hoped the Princesses mentioned in this manuscript would all be wearing clothes reminiscent of their culture or at least Safavid interpretations of their garb. Unfortunately, a majority of them appear to be wearing the fashion of the times, that is, Safavid fashions.


The Moorish Princess, F165v The Tartar Princess, F168v
The Russian Princess, F171v The Khvarazm Princess, F178v
The Chineese Princess F180r The Greek Princess F184v

Happily, the Indian Princess and her attendants wear something slightly different.


The Indian Princess. F159v Indian Princess' attendant / dancer


Saturday, 17 November 2018

Tyrant productions part 2

So, since I've been making hats recently, I decided Tyr needed one to complete his outfit. As many before me have discovered, accessories like hats take a costume from 'I rolled out of bed' to 'I am Dressed'

Let it never be said that Tyr doesn't like hats (don't believe me? I've got so much photographic proof).

This hat was made in a similar way to the St florian square hat however I used white silk for the lining and didn't cut any shapes out of the wool. He doesn't have a device that'd translate well into cutouts and I was hesitant to ruin a perfectly good hat. We did add a button to the middle because it seemed the right thing to do. Proportionally the button should be bigger (or the hat smaller) but it is what it is.

The hat has had two formats so far. Originally the hat was edged with a galvanized steel embroidery loop size extra extra large. The sort you can buy at Spotlight. This turned out to be a mistake as the edge was too heavy and while it didn't deform while worn, it did try to edge down the wearers head. At festival someone showed Tyr how to tuck under and sew down the edges of the square to make it more of a puff to stop the runaway brim. Very similar to how the St Florian 1 hat ended up. It seemed to work but it still wasn't ideal.


After festival I cut out the embroidery loop and threaded the edge of a witches hat through instead. I had to trim the witches hat wire slightly and crimp it together with some metal tubing. It has significantly reduced the weight of hat however the brim will now pringle if jammed onto a head oddly. Given pringling or maybe drooping appears in some of the documentation, I'm not too worried about that. I've also unpicked the puffing and tacked the corners of the square to the edges of the hat. I think it's a little plain but it looks lovely with the feathers on it. Maybe someday it'll get some slashing, who knows?

Turns out, it's almost impossible to take a selfie of the crown of a hat if its brim has a diameter of 50cm. Though, if you stuff a bike helmet in it, and place it on the floor, the dimensions are about right.


Tyrant productions Part 1

The start of my year was very much caught up in preparations for Rowany Festival. If you are familiar with my projects, you'll know I've been the RF cartographer for 6 (?) years. Ever since I created the job really. It involves a lot of fiddling around with maps and doing my best to please over 800 stakeholders. This year, I was also making garb for Tyr. He needed enough garb for a 6 day event and he's not the sort to schlep around in a basic t-tunic. Oh no. Unfortunately, the only items he had were a couple of shirts I'd acquired at Pennsic and a vest he brought along.

As the shirts were late-period-ish, we had to settle on a wardrobe collection that'd please his sense of flair and wouldn't be too challenging for my sewing skills. We eventually settled on Landsknect, partly because I've been collecting images for hat making, and partly because it has so many options.

I'm not going to go into everything we made, but by the end he had 4 pairs of pants, multiple shirts and a vest. As I've never made fitted pants before, it was quite a learning curve. Tyr also helped out by fray-stopping all the slashed edges. He also sewed some codpieces.

Tyr accidentally in the background... photo by Rachel Vess

I suspect Tyr is really proud of this codpiece. He designed and made it himself. As one of two token American's he didn't really need to advertise but it garnered no end of appreciative smiles. Unfortunately, it was washed in warm water and the red ran so the codpiece is no more.

Friday, 16 November 2018

St Florian hats

St Florian Hat 1 at Rowany Festival. Photo by Rache Vess.

Late last year I made some hats for the upcoming B&B of St Florian. The hats needed to be appropriate to their German garb and tie into the St Florian device which is a purple buttony cross on a white background.

For these hats I used a heavy black wool which was a little too stiff for a coat. Their expect-ellencies supplied me with some purple and white satin material which they were going to use on other aspects of the garb as well. I used halloween witches hats to provide rigidity to the brim.

This project suffers from the same problem my cranach hat did, where black wool is very hard to photograph well so instructions but no step by step photos are below the cut.

Thursday, 15 November 2018

UFO extravaganza

I haven't posted in a long while due to a combination of crazy work hours, limited internet and a phone (camera) that's on the fritz. One major change in the last month is I've been housebound recovering from major organ surgery. As a result, I've had plenty of time to tackle my unfortunate collection UnFinished Objects. I've managed to clear at least one Australia Post tub of items. I'm pretty proud of this spring clean.

Friday, 9 June 2017

Pelican outfit #7: The completed outfit


Testing the outfit the night before - who wore it better?

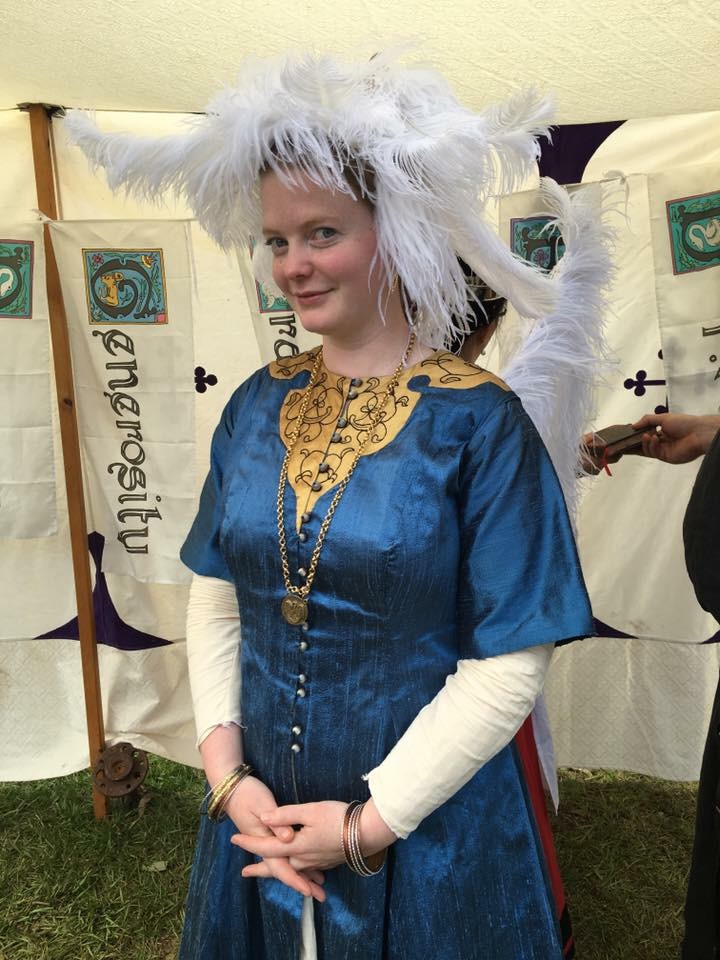
I'm really happy with how my Pelican outfit turned out. It's by far, the best thing in my closet at the moment. I'll wear it at other peoples special occasions. HUGE thanks to everyone who took photos for me, the Peers who spoke of the virtues. My crazy friends who helped me sew the hems, and make the hats and wings and were generally supportive of my ideas. Massive thanks to THL Elizabet Hunter who painted some lovely silk banners of key virtues I believe any peer should uphold and Sharon of Elizabet's Handspun who handspun the black silk thread I used to embroider the golden cloud collar. I love you all!


Thursday, 8 June 2017

Pelican Outfil #6 - The hat and wings


The hat (and wings) on a Peri. The hat often has the same texture as the wings.

The hat has been viewed in passing but was the best part of the whole outfit (in my opinion). The hat came about when discussing my vision with Iglasia. She and Ciara encouraged me aim high and ignore my doubts about allegorical hats. While I was in my home town, frantically embroidering, Iglasia and her husband Edmund whipped up a base for the hat and wings because they're amazing and creative.


Not being hatters we went with a theatre style base - coat hangers with a stocking stretched over it. 

Once I reached Brisbane, we created a knob out of polymer clay which we baked in the oven and painted gold.  I had originally considered making leaves of silk with lightweight wire to support the flare. After long discussions with a variety of people, I decided to use ostrich feathers instead. So we went on a mad dash through Brisbane to buy some large white ostrich feathers before the event. Norm from the Feather Duster Superstore was amazing and provided us with some lovely quality feathers! (Check them out here - their website has had a makeover since last year and is MUCH easier to find what you might need). We got enough to make the hat AND a set of wings.


Late that night, the night before the ceremony, Ciara sewed the feathers to the hat by whip stitching their stems to the frame. Helen and Iglasia helped me with embroidery and finishing the hems on the dress while everyone helped make the wings happen. I'm so appreciative of my friends staying up late to help me when I had underestimate the amount of time this project would take - and then added the Hat and Wings on top!

If I had of given myself more time, I might have decorated the feather stems with gold sequins or something. Still, I love how it turned out and can't wait for a chance to wear it again.

Tuesday, 26 April 2016

Pelican outfit #3 - Cloud collar patterning

I've started work on the cloud collar. First step was getting the dress (mostly) right so I knew the collar opening and shoulder dimensions. To work out the neck line I simply sewed the dress front and back together then lay the resulting collar shape over some scrap paper to sketch out the neckline.

This next step involved sketching various designs from period references before drafting the cloud collar pattern onto paper. While I am referring to my two primary images from the previous post, I'm also using some of Miriam's research. She kindly sent me PDF's of her complied images which have been extracted from a variety of manuscripts. Her focus is on the Persian examples of cloud collars while I'm trying to look at the Timurid / Persian / Chinese influence on the garb of the Indians of the Mughal. You can see from my previous posts regarding the range of garb the Indians wore (including venetian dresses) that the fashion forward ladies of the Mughal Empire were likely to adopt a variety of designs.

The shape of the collars in the Indian reference is very similar  to the Persian examples so given the huge collection of Persian images I find myself in possession of, I've based the shape on them.

To get the shape I took my neckline sketch, I folded it, refolded it and folded it some more until I could get each of the lobes symmetrical. They also had to fit the scrap of silk I'll be using for my test outfit #3.

Evolution of the back shape. When I decided I had cut away too much paper, I sticky taped another section on and extended out that part as you can see is occurring on the left from the middle down.

Once I had my shapes, I cut out a whole collar to see what it'd look like around my neck. Being paper it didn't drape well and I couldn't tell if it was right so I cut it out of yellow fabric and pinned it to the toile I discussed in the previous post. I knew I was on the right track because it looked like some of the out of period collars I'd managed to google.

I pinned the yellow collar to the black cotton toile. I liked the narrower point at the front and the slightly wider point at the back however the points on the shoulders weren't lining up with the seams, they were about 2cm off. Back to the drawing board

The main difference between these two collars are the angles of the lobes. The previous attempt had the center lines of each lobe at 90 degrees from the previous one. This one has slightly smaller lobes on the shoulders and back and larger on the front resulting in 80 (ish) degrees between center lines. The key hole cut outs between the front and side lobes weren't working properly so I redid the one on the right. The one on the left is too close to the neckline and may get sewn in when the garment is sewn together. I only need half this pattern to cut the fabric so I've left the bad one in to remind me to pay attention to the neckline seam.
I took the plunge and appliqued this one once I assured myself the neckline matched up and the lobes on the shoulders worked. I need to practice applique with the machine or do it by hand for the final one because even though I covered the thing in pins, I still managed to buckle some of it. I think more, smaller pins and a sharper, thinner sewing machine needle might be the first step. I could also leave some lines of embroidery with which to sew the applique down onto the dress with to help avoid buckling. Maybe a line around the outside? Hand sewing is never as tight as machine sewing and I'm quite worried about messing up with my embroidered collar. I'm going to have to practice a lot!

I'm not sure I like the wider front and narrower back, I'll have to decide if having the shoulders off set from the seam is such a bad thing, or maybe I can just alter the lobe without changing the front. The shoulder lobes wouldn't be symmetrical then but it'd allow the front to become narrow. I may line the toile just to see how much of the front I'll lose to the seam and see if that fixes the problem.

Either way - pattern 95% done!

Monday, 25 April 2016

Pelican outfit #2 - Patterning the coat

Now I've determined I'm going to make a fitted coat in the Indian style, the trick is to pattern it. Given that patterning typically takes more than one person, and I am reasonably deficient in the sewing skills department I decided to hunt through the commercial patterns to see if there was anything I could adapt to suit my needs.

I came across two potentially viable options. The first seemed perfect for a Persian coat given that it was loosly fitted, with long sleeves and designed to clasp under the breast. Closer examination of the pattern though shows very little shaping in the design and the toile would be difficult to adjust to follow my curves. There isn't a bust line seam so any shaping would have to come from the side seams, which would just end up pulling on the clasp making the coat look ill fitting and me look too busty. I get that enough as it is.


Pattern number two is probably the jackpot. It has centre bust seams which I can use to fit the dress. It has an optional upright collar which can be seen in some of the Persian dress examples. The downside to this pattern is I'm going to have to design my own sleeve template because I do not want puffy shoulders. This is a major downside because sleeves have been my biggest fail in the past. The other adjustment I'll need to make to this pattern is flair it more over my hips and lengthen the design.


This pattern luckily comes with a "lengthen or shorten here" line along the waist so I have a good idea of where to start my flair from. For my first toile I used 90cm wide black, mid-weight cotton I had lying around. I don't tend to keep calico in my stash and I find black shows up chalk marks much better than most colours. The downside to black is the photos don't turn out all that well. I laid out the pattern pieces and continued the line of the final 25 cm of pattern down to the full length of the fabric. I then sewed the pieces together (minus the arms) with the widest stitch possible making sure I remembered not to double back on my stitches at the start and end.

To fit the pattern I pinned the front closed and pinched each seam around my waist and under my breasts and stuck a pin in. I used white chalk to mark the peak of my breasts, hips, bottom and my nautral waist. I then unpinned the front and chalked a line to connect the pins smoothly to the sewn seams retaining the points of flair around the hips and bust and smoothly curving into the waist. The waist came in about 6cm all up and the under-bust came in 3cm on each side. I also made sure to smoothly curve the side back seams up to my shoulder blades as I've been ruined outfits in the past by neglecting to fit the back right. The most important part of the fitting was getting the shoulders to sit right. Until I made a dress for Tamar's wedding I never realised that this was a thing. I guess I hadn't given much thought to the different shapes of shoulders given I'm usually wrestling with a non-standard bust to ribcage ratio.

Once I had the fitting lines, I sewed them up with a tighter stitch and trimmed away the excess fabric. Once I was sure I had the fit right, I unpicked the side seams so I could lay the dress flat and trace the neckline for the cloud collar.

During my first trial I decided that the coat was a little too tight around the upper thighs and if I make it any longer I may have trouble walking. The images of both the Indian and Persian coats show plenty of fabric in the skirt so I decided to make another toile with greater flair from the hips. This one I've made out of a dark blue brocade. It's not really a toile, more of an experimental garment. I'll trial a non-embroidered silk cloud collar on it and attempt to line it as well.

In the mean time, here's my first toile with my first attempt at a cloud collar pinned to it. The hem is a little jagged due to my ad-hoc lengthening method but I'm reasonably happy with the waist and chest fit. I'm pretty sure it won't pull on the buttons or clasps in a terrible way.


The collar didn't work as well as I planned so I decided to tackle the sleeves next. I ran out of scraps of black of an appropriate size so I used some maroon cotton I had left over from an experiment with Roman garb I did about 5 years ago. I used the maroon as sleeves and may use it to line the brocade test garment. Anyhoo, I'm not so good with sleeves as mentioned but I think I've worked out some of the secretes and I present my sleeve pattern. Please note this is a half sleeve pattern as the left side is designed to be placed along a fabric fold.


A is the crest of the shoulder. It is possible to the top line A-B more of a sinusoid (as shown in red). The greater the depth of the sinusoid, the greater the angle of the arm. If you do not have a sinusoid or a curve, the arm will sit square like the classic T-tunic shape. Most female garments have some sinusoid to the arm in modern clothing. Having the arm inset at an angle cuts down in excess fabric in the arm pit however it does mean if you need to lift your arms above that angle you'll be lifting the whole outfit. I especially hate this feature of womens reflective work shirts so I've decided to keep the curve to a minimum.
B is the armpit. You could use a rectangle and have a gore but since I have fabric to burn, little desire to sew more seams than necessary AND I know the Indian tailors of old were experts at seams and fitting, I've decided to go with a tapered shape.
The line A-B is the measured distance along the inside of the dress sleeve. I'll increase this distance slightly by adding the curve but that's negligible and will sort itself out during sewing.
A-C is the length of the sleeve. In this case the sleeve reaches to my inner elbow. This length seems to be a common feature in Indian art but was truthfully dictated by the size of the fabric scrap I used to trial the arms.

I couldn't complete the arms until the final cloud collar design had been appliqued on but here's how they turned out.

You can see the final shoulder seam is sitting too far below the point of my shoulder and there's excess fabric in my armpit. I should be able to resolve both of these problems by bringing the seam back to the point of the shoulder. I will experiment with this further on the blue brocade test dress.

In the mean time, now it's appliqued, I can probably do some cheater mc-fee modern finishing touches, like a sewn rolled hem on the sleeves, over locking on all the seams, a placket down the front and a commercial frog or three and turn this into a plain but nice modern summer coat.

Saturday, 9 April 2016

Women with cloud collars


So, I've documented a range of cloud collar type things were worn in the Indian Sultinate (Northern India) pre 1600's. Unfortunately, the number of pictures of women wearing such things is limited. This is because illustrations of women seem to make up a smaller proportion of the preserved images available in the museums and on auction sites such as Christies and Sotherby's. It is also because other styles of clothing were worn at the same time so the choice of garb the artist painted was dictated by this school as well as his clients. None the less, I present some women wearing cloud collars with attention paid to where these images are from.


<-Iran

Detail: mid-16 c. Portrait of a Woman Tempura on paper. Dimensions: H. 16 7/8 in. (42.8 cm) W. 10 1/4 in. (26 in.)  Met Museum, Accession Number: 52.20.6.

Mughal (India) ->

Detail - Bābur Seeks His Grandmother's Advice Leaf from the Read Mughal Album, but formerly fol. 86 in the British Library's Bāburnāma. Mughal, ca. 1590–92, probably by Sānvalah, with early-nineteenth-century borders. 440 x 294 mm Purchased by Pierpont Morgan, 1911.; MS M.458.18. 


<- Iran, Tabriz?

Wine Drinking in a Spring Garden Object Name: Illustrated album leaf or single work Date: ca. 1430 Geography: Iran Culture: Islamic Medium: Opaque watercolor and gold on undyed silk Dimensions: 8.5 in. high 30.20 in. wide (21.6 cm high 11.87 cm wide) Met Museum. Accession Number: 57.51.24 

Iran, Tabriz ->

Detail: "The Feast of Sada", Folio 22v from the Shahnama (Book of Kings) of Shah Tahmasp

Painting attributed to Sultan Muhammad (active first half 16th century)
Folio from an illustrated manuscript ca. 1525 Iran, Tabriz Met Museum Accession Number: 1970.301.2


<- Turkey

An Ottoman Drawing of a Peri, attributable to Veli Can, Turkey, 16th century. Sotheby's - Arts of the Islamic World 24 April 2013, Item 97
Turkey, Istanbul ->

Kneeling Angel with Cup and Bottle mid-16th century Shah Quli Ottoman period Ink, opaque watercolor and gold on paper H: 19.3 W: 10.8 cm Freer-Slaker Museum, F1933.6


Thursday, 7 April 2016

New obsession - cloud collars

Persian cloud collar, 15th century.

I haven't posted in a while because I've been doing pretty much nothing on the creative side. I made some brooches for their Maj's and some other random odds and ends but no heavy research and minimal ceramic painting. Well, right until Tamar asked me what I wanted to wear for my Pel ceremony. Frankly I hadn't given it much thought because saying 'sure' was a hard enough decision. Then I got to thinking, maybe I should wear Indian, because it's unusual and hell, it's not often you get to drape yourself in all your best garb and parade around Then I thought, maybe Persian,  because you know, pants.

So I started researching both and fell down a minor rabbit hole called cloud collars. Seems like they were something the Chinese had been doing their garb for quite some time but it also features in middle eastern art of the time as well as turning up in Indian manuscripts. The illusive images I'm hunting are from the time of the sultinate. The images that feature both Indian and Persian ladies in different poses and types of garb.

Anyhoo, while I hunt for them, I keep getting distracted by these collars. I've only seen them on one other sca-er and he was wearing Mongolian at the time. I'm thinking it might be a nice pun on my newly registered name Ant Blowme (pronouced bloom) of Saint-Cloud.

I have a little pinterest collection started up for cloud collours, timurid designs and other related items but a basic run down is as follows:

Cloud collars are an embroidered gold design on a long tunic like outfit that buttons down the front. It typicaly is lined in a darker fabric and has a turned collar. The tunic can feature long (past the wearers hands) fitted sleeves or shorter wider sleeves. The short sleeves may also feature embroidery. Both short sleeve and long sleeve garments were worn over a similar undergarment of a striking and contrasting colour. I'm not sure yet if the embroidery is appliqued on or applied to the fabric directly. There are very few extant cloud collars from this time period but it's not clear if the original garment was made from the same piece of cloth. The following image, Visit to a Dervish, contains a selection of men wearing both cloud collars and non decorated garb as well as long and short sleeves. The colours indicate the cloud collars were made of the same colour fabric of applied directly.

Visit to a Dervish. 1560-1561.  Christies, Sale 6622, lot 12.

Spikey and small, point just reaches point of shoulder Short matching sleeves, more vine like. Drops just onto arm
Small collar and chest (not waist lobe). Also, wear it like a straight jacket! Dark lining for sleeves and collar but additional plane lining? Circular collar
Extra lobes down to the belt, collar extends to mid arm. Embroidered sleeve guy has no collar. Paired buttons, wide collar, lining dark but not contrasting.
Slightly cloud like, long sleeve Two lobes to belly button, very child drew a cloud shape