Showing posts with label Not-so-pro tip. Show all posts

Friday, 24 April 2020

Basic hydro-abrasion

Recently I encountered a fellow potter at Claymake. She had the most lovely relief patterns on a cup. When I inquired how she'd achieved such fine lines she told me she was experimenting with shellac resist then removing the clay body with water. She couldn't tell me much more about the process so I decided to google it. I couldn't find any videos on Youtube but there are a number of ceramic boards which make some interesting reading. One board suggested using shellac as a resist as it's a naturally derived product that will burn off in the bisque firing. The following is my initial experiment and thoughts.
The only brand and smallest bottle of shellac available in the store. It would have been cheaper to purchase shellac flakes and make my own but there were no solvents available so I couldn't.

A slightly skewed cup. I picked it up when it was too damp and it tilted. Still usable and if not for this experiment it wouldn't have been fired.

Step 1:
Use a paintbrush to apply shellac to dry greenware. The greenware will adsorb all of the alcohol and the shellac will dry really fast. If you want finer lines, leave a small amount of shellac out in the sun to thicken for half an hour or so.

Thoughts - the shellac applies well but when it is the thickness of water you either need to only have a small amount on your brush and keep dipping and wiping or use a thicker consistency. If you don't, drips of shellac will spread making thicker lines and blotches. I like the golden shine and can see why this is used on furniture.
It occurs to me that stencils could be used with technique if the shellac were slightly thicker.


Step 2:
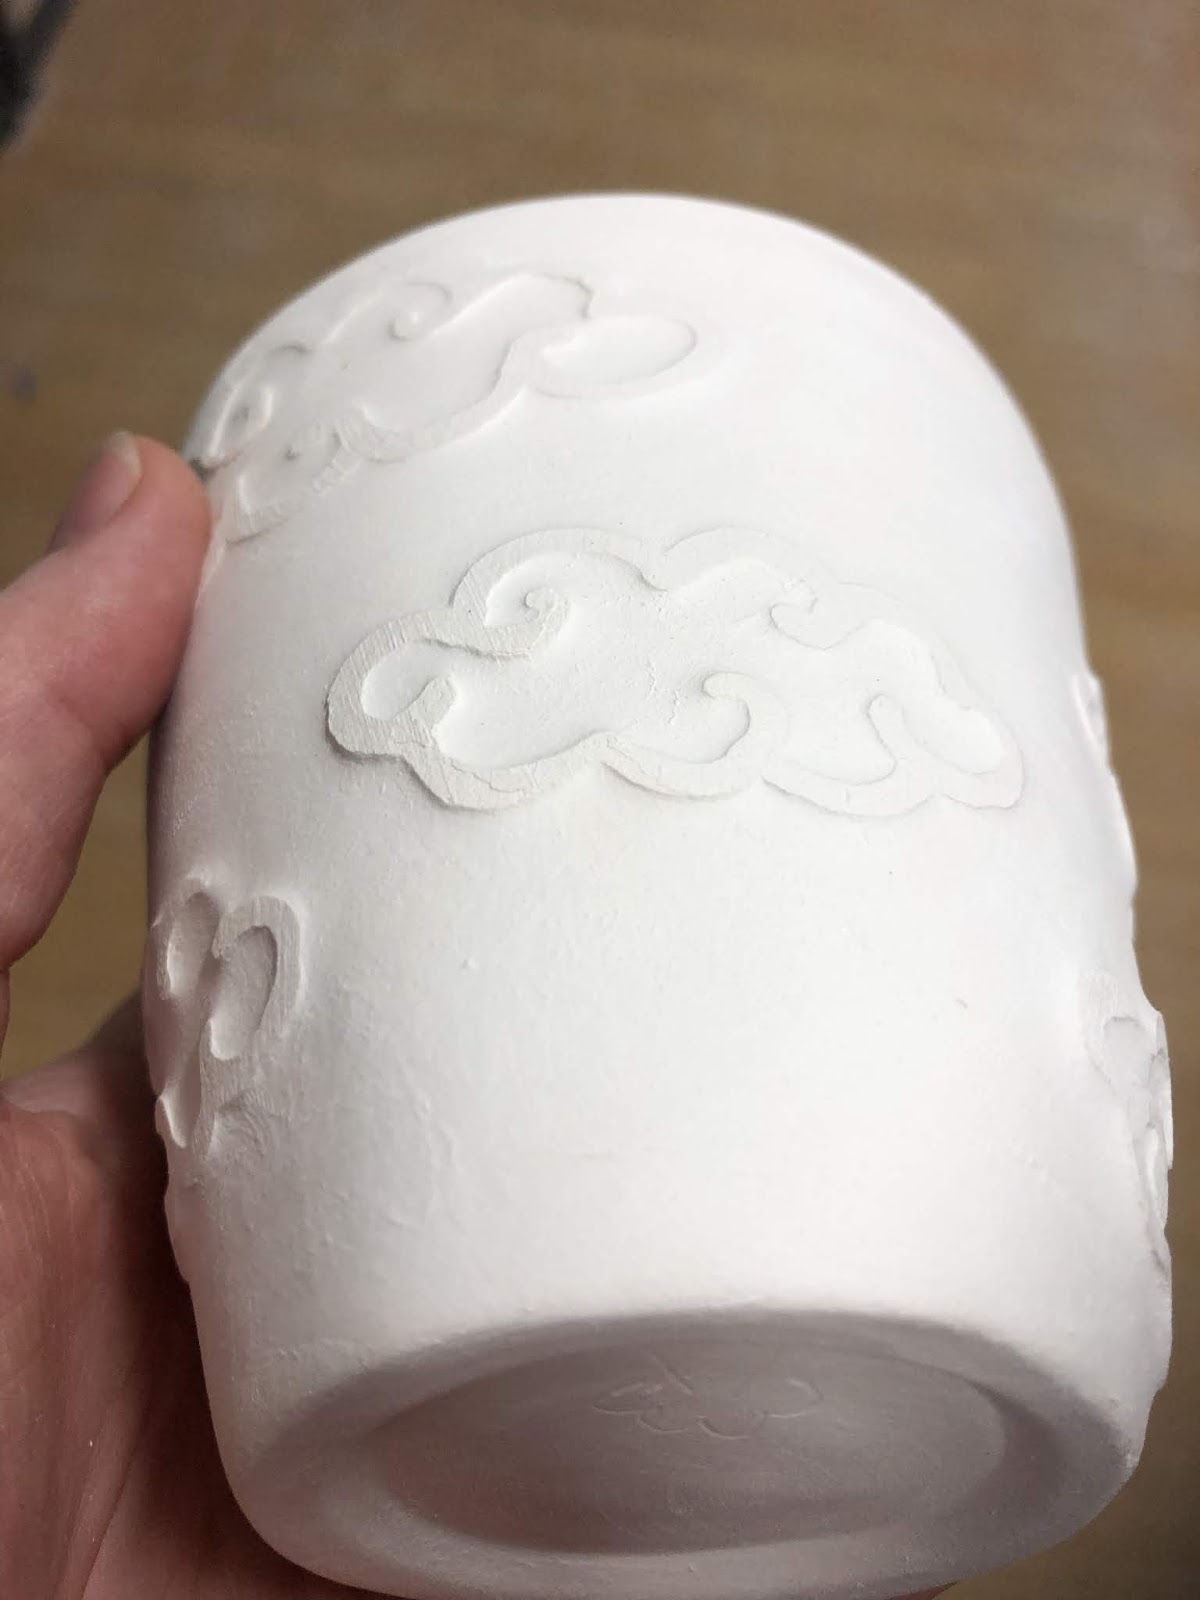
Use a wet sponge to wipe away clay from around your design. This is called hydro-abrasion even though typically that term is applied when using pressurized water. Circular motion of the sponge seems to prevent one side of the line from getting too much lower than the other. When the clay turns to a slurry, use the other, sopping, side of your sponge to wipe the clay away. Work on one area then move to another.

I used a brand new dish sponge. Under the sponge is a bit I've already done, the other three clouds still need attention. It's reasonably easy but I did get clay water everywhere.

Thoughts - This may work better as a staged step. I found that the water had undermined the strength of the cup. As I posed and held the cup my thumb has created a small divot in one side while between my fingers a small crack has formed. I think I managed to fix both but I believe that I need to reduce the amount of free water and probably do one side, wait for it to dry then do the other side. In the image above you can see a small area on the bottom cloud where I've accidentally wiped away the shellac. I believe this was because it was rather thin in that area. The thicker shellac, the more golden areas, seems to have held up fine.

Step 3:
Bisque fire it.

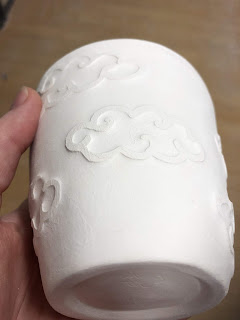
Thoughts - It came out well. I'm really happy with how the relief works. I think it'll show off a glaze nicely. I also think this could be a substitute to create once off tiles patterned off molded items.


Step 4:
Glaze & stoneware fire it. I chose midnight blue glaze with a clear overcoat.

Thoughts - Love this look. Next time I'll use a thicker cup and try a two layer design. I think this may work really well for some heraldic displays similar to those carved in marble. I may also try a colour resist. After the first wash, I'll place some englobe or underglaze on the cup and then apply a second coat of Shellac.

#not-so-pro tip: hydro-abrasion works best if the sponge is run parallel to design. Right angles creates more of a sloped edge and it is harder to achieve a clear difference in clay body level.

Tuesday, 1 January 2019

How to make tables in Blogger


1 - An example of images inserted into a table so Blogger will display them side by side.

If you've been following my blog, you'll notice I like to present some of my data in tables. Blogger doesn't have an 'insert table' function so you have to use a work around. Typically my tables are the form of one or two images side by side with a caption followed by a caption (1). To force Blogger to display two images side by side I do the following:

  • Open Microsoft Excel (Word or anything that you can use to create a table should work)
  • Work out your column and row numbers
  • Insert dummy text
  • Copy entire table and 'CTRL-V' it into the Compose tab of blogger.
  • Replace the dummy text with images using the arrow keys to pan through the boxes in the table.
  • Add a caption as standard text below the table or individual captions using 'Left click -> Add Caption'

This simple system works really well and beats having to play with HTML code. Unfortunately, this won't always work. Blogger will automatically resize your text filled columns to conform with it's presentation style. This can result in endless pages of single spaced letters creating an unreadable blogpost.

There are two ways to address this problem. This first is my new favourite brute force hack method which I use when the second method becomes too fiddly. The hack involves exploiting bloggers auto-resizing system. This can cause problems for people viewing your blog on different screen ratios so utilise carefully. To exploit bloggers auto-resizing system:
  • Arrange your columns as you'd like to see them in the compose view
  • Screen capture the headings of your columns as individual tiles
  • Replace the titles of your columns with the new images
  • Blogger will maintain the columns at the size of the image rather than shrinking to fit the rest of the text.
2 - An example of image column headers. Blogger auto-formats them with a shadow so factor this into your chosen style. Note the faint line near Date - that's the end of the standard Blogger page.

The final alternative is to play with the html tab. Some help blogs will recommend that you create your table in Word, save it as a .html file, open it in Notepad and copy the code across. This is a great quick and dirty method for creating a table however it'll often come with a load of code that relates to formatting that you simply don't need as Blogger ignores it. A note of caution: Blogger will also correct your html, changing some of the designations at times. You can manually correct this if you know where the issue occurs. Flicking between the Compose and HTML tabs helps a lot. You'll also need to know the following:

3 - image of basic HTML required to create and modify your table
Good luck and happy blogging!

Friday, 16 November 2018

St Florian hats

St Florian Hat 1 at Rowany Festival. Photo by Rache Vess.

Late last year I made some hats for the upcoming B&B of St Florian. The hats needed to be appropriate to their German garb and tie into the St Florian device which is a purple buttony cross on a white background.

For these hats I used a heavy black wool which was a little too stiff for a coat. Their expect-ellencies supplied me with some purple and white satin material which they were going to use on other aspects of the garb as well. I used halloween witches hats to provide rigidity to the brim.

This project suffers from the same problem my cranach hat did, where black wool is very hard to photograph well so instructions but no step by step photos are below the cut.

How to dino

a) Triceratops trial.

I thought I'd share my process for the geometric dinosaurs I've been playing with this last year. It's quite straightforward if you follow some basic rules:


  1. No curves
  2. No partial terminations.
  3. Triangles must orientate with the direction of texture flow
More ideas below the cut

Sunday, 3 April 2016

Remaking the blue dress - Step 3


I've removed all the hooks and eyes except the two on the waist band. You can see the damage done to the inside of the fabric from the threads in the pic above. I've replaced all the hooks and eyes with lacing rings. I initially had trouble working out how to do this. I had thought of winding my own rings but then I realised if I just butted the ends closed, they'd rotate and pull through the securing threads eventually, or since they are always a little rough, eat through the lacing cord. I then considered soldering a bunch of loops together but it'd be labour intensive, and again, i'd probably end up with rough sections which wouldn't bode will for the long term viability of this dress. I asked around to see where other people source lacing rings. Turns out there's two good options 1) buy them from a medieval retailer who is usually at GNW and Festival for an exorbitant price OR go to my local fishing shop and buy them in packs of 10. This turned out to be a bonus for me because they were having a closing sale so I got two packs for $8.

Not-so-pro tip: Buy lacing rings at your local fishing tackle store and save a bunch!

I haven't tried it on yet as I'm still making the cord I'll use with this dress. I may need to add extra loops if these are too far apart. This was a pretty easy thing to get of my things to do list once I'd actually gotten the rings.

Monday, 22 February 2016

Tidy ideas - how to sort your SCA jewellery

After moving house  I wanted to set up my spare room to hold all of my garb and accessories. I've repurposed the Ikea shelves project from last year and now it holds my garb, shoes, saris and sari accessories. I also wanted to hang all my jewellery and hats out to prompt me to actually wear some of it. I stole this idea from Duchess Constanzia who has all of her hats, hair accessories and jewellery on display to make mixing and matching easier. I'm not at that level yet because I dabble in too many cultures and don't really have sufficient breadth to my wardobe to mix and match (yet).

For this project you will need:
1x Ikea cork board (The bigger the better)
1x pack of push pins
1x pack of paper clips

Not-so-pro tip: The board comes with pushpins but not enough. You can buy the push pins and paper clips from Target quite cheaply as a school kit.

Step 1: Assemble cork board
Step 2: Hang cork board
Step 3: Push in pins, use a row along the bottom for necklaces
Step 4: Bend paper clips into hooks for items that can't be pinned (brooches etc)

I've clustered event tokens on strings on the bottom left and Pennsic / Rowany event tokens along the top. I may actually put them into a storage box and I'll never wear them again and as I make or acquire more items I'm going to need that space.

Friday, 26 December 2014

Schoodie / Squoodie


Schoodie - a combination scarf / hoodie
Squoodie - a combination scarf / hoodie with a squid theme

So, I didn't know schoodies were a thing until I went to Tobin's November Stitch and Bitch day. Apparently they are and my favorite Youtube channel, Threadbanger, has even done a short instructional video on how to make one out of an old sweatshirt (jumper) here. Tobin kindly lent me his pattern which he seems to have printed off the internets. I'm not sure where he got it but this seems like a rather simple three piece pattern which I may make next time. You can also get a ton of free patterns for knit or crochet patterns for scoodies simply by googling it.

I made the schoodies in November as a gift for my man who's currently contracted out to work in the sandbox. As it's winter over there (a cold Christmas - what a barbaric idea!), I thought I'd make him something to keep him warm. I scheduled this to auto-post after Christmas so as not to ruin the surprise!

To make - follow these helpful instructions on Indie Tutes OR:

(pattern shown here is schoodie (with ears) not Squoodie)

1. Cut out your fabric.
Make sure you have 2x outer-shell, 2x inner-shell, 2x outer pocket pieces, 2x inner-pocket pieces cut in opposite directions.
When cutting the fabric be aware of the grain. Like fur, my bumpy fabric for the liner has a grain so I had to ensure that the pattern was cut to ensure the grain went down the tentacle. This means I needed 1.2m of liner fabric but only about 0.7m of outer shell.

I elongated the outer-shell of the hoodie to create the hood shape. I left the inner-shell according to pattern to ensure the hood wouldn't slip over my mans face.


2. Pin the pockets rightside to right side and sew along top.
I decided to use the non-fluffy side of my fleece as the good or right side of the fabric so I pinned the non-fluffy side of the purple fabric to the fluffy side of the cream.


3. Turn over the pockets and pin along top to hold in place (if using cottons, you can iron the seam to hold it flat)

4. Pin pocket pieces in.
Pin in such a way that you can't see the colour difference (when you're done sewing this results in colour matching the pockets to the tentacles)


5. Start pinning squoodie together from the center front seam (right sides together)
Use ALOT of pins! I used pins ever inch or so. Fabric with nap like fur tends to slide on the fabric and will stretch and bunch if you're not careful. If you have one (which I don't) a walking foot may help


6. Sew
Sew from the center back along one tentacle.
At this point I decided I wanted to have a slight taper before the pockets to create more of a tentacle shape. I drew it in with water erasable fabric marker and sewed along the line
Keep sewing until you reach almost to the back again. Leave a hand sized gap.


7. Pull through and flatten.
DO NOT freak out if you end up with one pocket on the inside and one on the outside, simply pop the point back through and move the pocket to the side you want (your hood is actually fully reversible yay!)

8. Hand sew gap closed (or machine if you've got time restrictions and don't mind a weird seam at the back)


Adaptions:
I elongated the original hood to make a squid look. By sewing in a tight angle at the center back of the hood between the lining and the outer-shell I pinched the fabric in such a way that pulled the hood down to rest in an appropriate manner.

I considered sewing squid-eyes onto the hood but I didn't want to make it too cutesy.

If you can't find bumpy fabric like mine, consider appliqueing suckers onto the inner-shell tentacles.

If you're using fleece, you could add a quarter circle of fleece to drape out of the back of the hood. The fleece won't fray and you can slice it into tentacle shapes. Make sure this is sewn in so the stretch direction is down along the tentacles. Pull the tentacles to make them curl along the edges a little to hide the rawness.


It'd be entirely possible to elongate the hood to an extreme lire-pipe length for a pixie look.

Ears can be hand-sewn separately onto the hood, rounded ones for bears or pointy ones for a fox/dog.

Paw prints could be added to the outside of the pockets prior to sewing them in.