Showing posts with label Headwear. Show all posts

Saturday, 17 November 2018

Tyrant productions part 2

So, since I've been making hats recently, I decided Tyr needed one to complete his outfit. As many before me have discovered, accessories like hats take a costume from 'I rolled out of bed' to 'I am Dressed'

Let it never be said that Tyr doesn't like hats (don't believe me? I've got so much photographic proof).

This hat was made in a similar way to the St florian square hat however I used white silk for the lining and didn't cut any shapes out of the wool. He doesn't have a device that'd translate well into cutouts and I was hesitant to ruin a perfectly good hat. We did add a button to the middle because it seemed the right thing to do. Proportionally the button should be bigger (or the hat smaller) but it is what it is.

The hat has had two formats so far. Originally the hat was edged with a galvanized steel embroidery loop size extra extra large. The sort you can buy at Spotlight. This turned out to be a mistake as the edge was too heavy and while it didn't deform while worn, it did try to edge down the wearers head. At festival someone showed Tyr how to tuck under and sew down the edges of the square to make it more of a puff to stop the runaway brim. Very similar to how the St Florian 1 hat ended up. It seemed to work but it still wasn't ideal.


After festival I cut out the embroidery loop and threaded the edge of a witches hat through instead. I had to trim the witches hat wire slightly and crimp it together with some metal tubing. It has significantly reduced the weight of hat however the brim will now pringle if jammed onto a head oddly. Given pringling or maybe drooping appears in some of the documentation, I'm not too worried about that. I've also unpicked the puffing and tacked the corners of the square to the edges of the hat. I think it's a little plain but it looks lovely with the feathers on it. Maybe someday it'll get some slashing, who knows?

Turns out, it's almost impossible to take a selfie of the crown of a hat if its brim has a diameter of 50cm. Though, if you stuff a bike helmet in it, and place it on the floor, the dimensions are about right.


Friday, 16 November 2018

St Florian hats

St Florian Hat 1 at Rowany Festival. Photo by Rache Vess.

Late last year I made some hats for the upcoming B&B of St Florian. The hats needed to be appropriate to their German garb and tie into the St Florian device which is a purple buttony cross on a white background.

For these hats I used a heavy black wool which was a little too stiff for a coat. Their expect-ellencies supplied me with some purple and white satin material which they were going to use on other aspects of the garb as well. I used halloween witches hats to provide rigidity to the brim.

This project suffers from the same problem my cranach hat did, where black wool is very hard to photograph well so instructions but no step by step photos are below the cut.

Sunday, 8 December 2013

Persian block printed scarf II


From closer examination of Persian head scarf images from the previous post, I think the argument for square / triangle is actually misdirected. If we examine no.5 from the previous post and assume a regular pattern in the fabric, the head scarf  is deliberately cut in more of a brontosaurus style, that is to say, skinny at the head/tail ends with a sort of Gaussian slope towards the wide center. The length of the tales appears to be a little over a quarter of the overall width. I propose the headscarf is cut more as a T shape:

Where A is the width of your head from temple to temple, B the measurement from your temple to your shoulder and C the measurement from your crown to your cervical vertebrae. So that's my next accessory project... after I finish moving house anyway.

Saturday, 30 November 2013

Persian block printed head scarf.

 Some Persian head scarves, possibly block printed:

1                                                                                  2
   
 3                                                                  4
 
5

Head scarf examples. Patterns range from simple monotone, to complicated potential brocades or embroidery. All involve a triangular (or folded square) headscarf, draped over what appears to be a circular cap and braid case of a different fabric (often the same as the pants). Recently on the Persian Clothiers facebook group there was recent discussion on the shape of these headscarves. I propose that the contrasting colours on no. 2 & no. 4 (red & white / orange ) indicates a single layer whereas the two sided print and potential for two points on no. 5 suggest towards a double layer resulting from a square shape. The shape of no.'s 1 and 3 are indeterminate. No. 1 shows the same pattern on the underside, which may be a woven, reversible fabric or a doubled over square shape.

So I started with a square design because it's easier to measure and cut. I cut it out, block printed it with my quatra-heart stamp, ironed it and then machine sewed the hems.  As you can see below, the square is a little too small, too stiff and really the wrong shape. I also used an artifical silk scarf for the braid case and the cotton headscarf kept slipping off. Quite vexing.
Marshalling at November Crown, Stormhold, 2013.


Sunday, 2 December 2012

Sari I - complete


The weather was beautiful this weekend so I finally got a chance to wear my completed red stripe silk sari set to Stormhold's Monthly Bash. The sari fabric is 100% silk I bought from Spotlight for $10 (yay!) a number of years ago. It doesn't drape as nicely as I'd like but it's wonderfully light and simple.
It took me a while to get around to finishing of the edges of the sari and making a choli top to go with it. I completed the top last year... unfortunately, I've put on weight so I couldn't wear it this weekend. (I'm also not very good at shaped, supportive garmets yet) Instead, I whipped out one of my backup tops, a not-quite medieval, not-quite velvet (stretch) number in turquoise.
Accessories (very important): 20 gold plated bangles (from Dandenong), be-gemmed (imitation) necklace, earring and mangtikka set (from Footscray), and carnation headband. I unfortunately broke one of the earrings while taking it off, on the upside, I now have extra dangles to make more tikka's from.


I'm really happy with how the headband turned out. When I wear a plait, I frequently re-do it two or three times a day as I hate the whispy bits that eventually work their way free. After my flowered headband post I started working on a set of artificial flowers for my hair. This one was made from fake carnations (with the green sepal removed). I wrapped the headband in a cream ribbon and then hotglued the carnations on. I left lengths of ribbon dangling from the ends of the headband and tied additional carnations onto that. The idea was to braid the ribbon into my plait creating the 'covered in flowers' look and allowing me to avoid modern hair ties. Unfortunately it was too bulky for me wave in myself, and one of the flowers came off in the process. The headband keeps all the stray whispy bits from my face!
I might cut the ribbon off the headband and make the plait decorations an entirely separate piece. I still haven't gotten around to making a jasmine hair accessory, it's on the list though!

Things learnt: The green sepal is essential to keeping the carnation petals together. Hot glue can be used in it's place if you don't mind getting a few burns to your fingers when shaping the petals. Hot glue doesn't work for the braid bits though.

Note: Did you know there's an SCA India email list? I only found out this weekend! Excited!

Tuesday, 28 August 2012

Goldhaube


I've started thinking about making a goldhaube to go with my Cranach Gown (even though I haven't completed it yet). I've discussed haube creation in a previous post when attempting to construct a whitehaube. I've been toying with the idea of making something like the haube in figure 1. A beaded or gold net over golden fabric. Very classical Cranach. However, when tooling around on the National Gallery website today I found figure 2. An image of a small girl wearing a beautiful gold haube. It was painted Jakob Selsenegger who was an Austrian painter so not all that far from Cranach's hub of inspiration

The Goldhaube's band is decorated with pearls, like many of those featured in Cranach portraits. This however is very clearly a crochet net rather than a cloth bag with netting overlaid. The knots are quite exquisite and probably far out of my skill range - for now. The haube also seems to sit closer to her head and rides high above the neck. I think that will be the biggest challenge of crocheting this peice.


Figure 1: Portrait of a Woman. Lucas Cranach the Elder. 1525. The National Gallery. Detail of Goldhaube.


Figure 2. Portrait of a Girl. 1545-1550, Jakob Selsenegger. The National Gallery. Detail of Goldhaube.

Wednesday, 22 August 2012

Flowered headwear acquisition - Yay!


Last weekend while wandering the city blocks the boy and I stumbled upon some sort of Indian cultural festival. By stumbled upon,  I mean: we heard the Bollywood music from blocks away and I dragged the poor man all the way there. I happily acquired three new items for my Indian personal. The first (above) is a matched set made out of ribbon to represent strings of marigolds and carnations. The central loop is intended to go around a bun pinned into place through the white circles. The other loop can be strung around the head or through the plait.

Some similar garlands can be found below, though I suspect most of these are composed of actual flowers.

(Figure 1 - left) Aishwarya Rai's wedding hair. Totally my most favorite actress.  (Figure 2 - right) A modern Australian bride with beautiful jasmine in her hair and simple yet elegant decorations for her Hindu wedding.


Figure 3 - Other methods of using flowers to decorate hair - wrap enough jasmine flowers around the head to create an aura of flowers. Use jeweled pins to pin the braid together (something like this is on the things to do list)

Figure 4 - Strings of jasmine buds can dangle from the head and will provide a light, refreshing scent throughout the day. Don't have long hair? Wrap the entire 'braid' in flowers and no one will know!

These days the best flowers-in-hair images come from Indian weddings where hours are spent getting the bride's hair perfect. However, simpler arrangements can be use for day to day wear. I suspect wearing a jasmine garland all day will provide perfume through out the day.


Figure 5- Common women at household chores - Ajanta Caves - Cave 1?. The central figure seems to sport the jasmine flower aura seen in Figure 2.

Figure 6 - Dancer sporting intricate hair decorations as well as a fitted dress. Ajanta Cave 1 - 6th-7th CE

.

I also bought a string of fake jasmine buds. These have been created out of cotton, and the tips dyed green. They actually look alot like actual buds (right). I might try making some out of cotton wool buds and PVA. This is also designed to wrap around a bun, but this one ties with black wool string. I will have to strengthen it and make it easier to attach if I plan on using it at Pennsic.


I do wonder if I can get away with something like the arrangement shown in this portrait by De Vinci. Incrust the net at the back with flowers. Secure with a jeweled band to the forehead and bind and decorate the braid and hair extension as shown.


Friday, 16 December 2011

Haube

So I need to make appropriate headwear to go with my Cranach gown. I've made the snood but it really needs a gold-haube inside it or as part of it. While  I have the perfect gold silk, I'm really really not willing to cut it up unless I know what I'm doing... which I don't. So I decided to make an experimental haube.

 Figure 1: Goldhaube detail from Ill matched Lovers (unequal couple) by Lucas Cranach the Elder 1528.

Step 1: Pattern
I spent an age online trying to find a pattern for a goldhaube, or really any haube. Nothing. There are many descriptions of what I call the sausage hats depicted in many german portraits (and some Cranach portraits too) but nothing of the Cranach snood-esk headwear. The best two references I could find were a blog written in german which suggests using a half oval who's diameter (long side) is the circumference of your head, and who's radius is the distance from forehead to nape of neck. Another blog (in english) discusses something similar but she used this as a pattern for St Bridgets headwear so had ties that looped around the head.
So I made a pattern as suggested and tried to see if it would fit.


 The pattern with allowance for the embroidered forehead band.
Attempt at fitting paper pattern side.
 Fitting paper pattern back.

Step 2: Cut out of fabric, overlock/surge, iron and pin hems
I used the same fabric my dress was made out of so it'd match.


Step 3: Realise that if haube experiments are created out of pink fabric there needs to be a net or snood over the top. This would require tacking a net of gold cord onto the snood. Too much work for an experimental haube. New plan!

Figure 2: White-haube detail from Amorous old woman and young man by Lucas Cranach the Elder 1522.

Step 4: Repeat step two with white cotton fabric (ex-bedsheet). Cheat on wide forehead band by utilising pre-sewn edge of sheet. Machine sew folded edges.

Step 5: Measure and mark points along flat side (back) of haube every centimeter and gather.

Step 6: Check fit


Front: good fit and feels snug, but shows more fringe than most goldhaube images
Side: Doesn't drip down the back of the neck like many snoods. If I had more hair, bundled higher on my head I suspect it wouldn't project as far either.
Back: Sits higher on the neck but doesn't expand out the side of the head much. This may be because I don't have much hair to cover and I haven't made buns to the side of my head, rather looped up two braids.

Over assessment: rather happy with the fit. I'm not sure how I'll fasten this, I can add a tie to the gathered section so the haube can change size as I grow more hair or I can add a clip which would ensure that it doesn't loosen during wear.

EDIT: Over christmas, unhappy with the simple gathering, I replaced it with my first ever attempt at smocking. Smocking stretches quite a bit and doesn't gather as tightly as I'd like. Future attempts will gather the back at points greater than 1cm to ensure more gather in a smaller space and I might avoid smocking for haubes.

Monday, 28 November 2011

Fabric find!

Found the perfect fabric for the snood lining (apparently called a goldhaube) in my fabric stash today!
I think it looks great under the pearls and from a distance looks enough like red hair.
My habit of buying interesting fabrics on spec has paid off once more!


Thursday, 24 November 2011

16th Century Saxon hauben (snood thing)

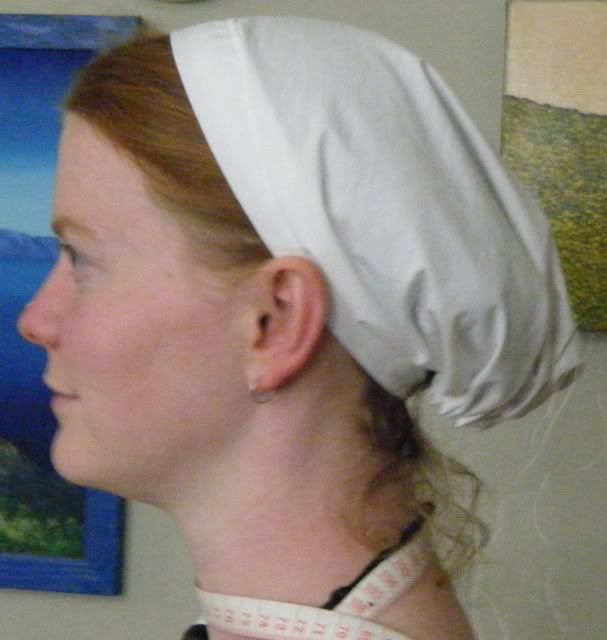
As I am working on a 16th c Cranach gown (saxon), I need to create the appropriate accessories. I have started with headwear as I already have my first attempt at a dress. Many of the paintings by Cranach show women wearing what appear to be snoods –woven nets to keep hair bundled up and clean. So I created the snood below (Figure 1). Originally I was happy with the outcome of this project as this is the first time I’ve used precious stones and pearls on any of my medieval costumes. I felt quite spangly! However upon wearing it and undertaking further research I find it is not entirely correct and needs some alteration. I will discuss shape/fit, lining, bands and decoration as they are shown in Cranach’s paintings and how I plan on replicating this.

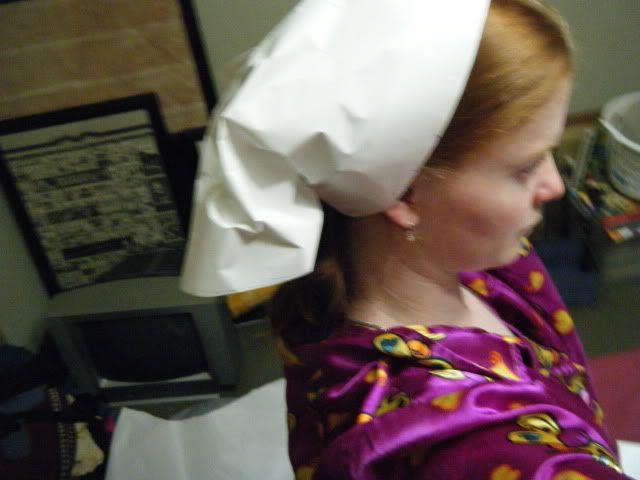
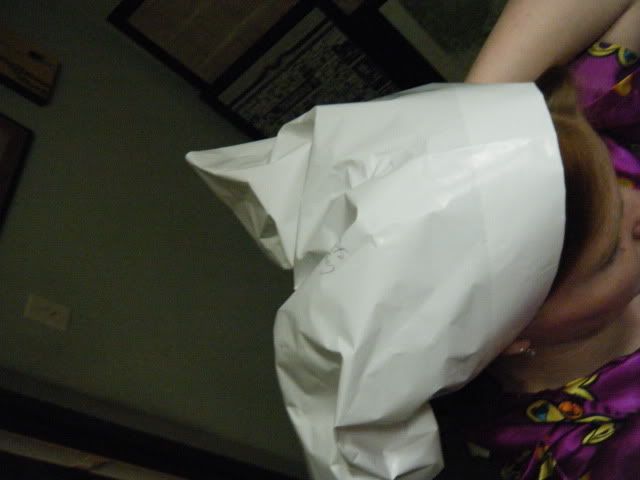
Figure 1: Cream snood - stage 1. Snood has been crocheted out of cream cotton and beaded with alternating cream pearls and garnets. a) worn with loose hair, b) worn with restrained hair

Shape / fit:
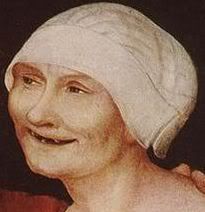
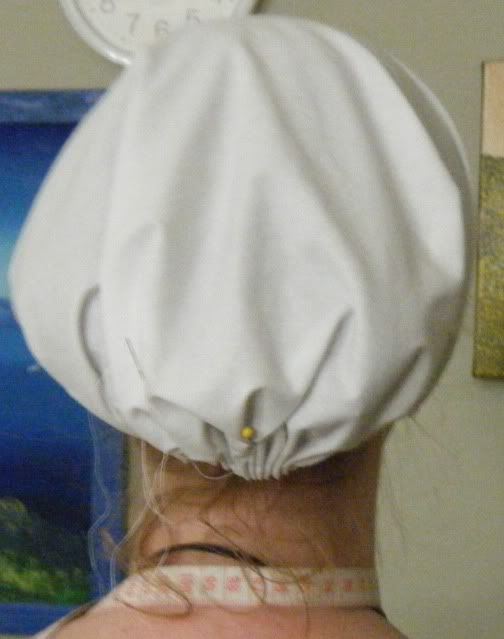
As can be seen in Figure 1a the weight of my hair pulls the snood down onto the back of my neck. A quick examination of all Cranach’s Ladies show the snoods ending well above the neck, typically at the base of the ear (Figure 3). Some like Figure 3e actually bulge out away from the head. This suggests that the hair was braided possibly similar to the style shown in Figure 2 before being wrapped in the snood. As the snood is a net, it does expand to accommodate hair growth which would mean the owner could use the same snood for many years.
Simply looping my hair up (Figure 1b) results in a much better profile and will ensure my hair doesn’t escape throughout the day. I have very fine hair and I can guarantee that it will get frizzy by the end of the day and end up poking through the netting. Tying or braiding my hair will help however close examination of a number of the Cranach portraits indicates the snoods were actually lined in an orange or gold cloth. (and here I was thinking that Cranach had a thing for red-heads.)


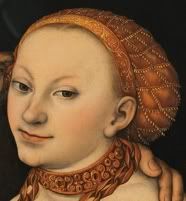
Figure 2: a) Saxon Princesses Sibylla, Emilia and Sidonia – detail of Sibylla’s hairstyle (Lucas Cranach the Elder, 1535). The contrast between the slick braids and the fuzzy decorative curls in front of her ears suggests this is a hair extension. An extant sample of this (b) may be part of Germany's National Museum collection however the information on this is limited (image taken from http://www.hartwoodcastle.com, 25/11/2011, image has clearly been scanned from a book and states "Nurnberg Germanisches Nationalmuseum Inv Nr T 2321 Haubenstock)

Lining:
Most of the snoods worn by Cranach’s Ladies appear to be lined. In many of the images this is difficult to see as the weave of the fabric as painted follows the same grain you’d anticipate from loose hair (Figure 3a and Figure 4) however on some a cross-grain has been painted such as that shown in Figure 3b. This is further supported by some images which show a distinct colour difference between the wearer’s curls and the snood (Figure 3e). Figures 3h and 3i show snoods which have been constructed out of brocade rather than a plain fabric with an overlaid decorated net. Most of the snoods show an even distribution of the net over the fabric suggesting that the snood is actually one piece and the decoration is sewn directly to the fabric. Only in Figure 3b do we see the net pulling on the fabric suggesting it is a separate piece. Additionally this painting does not show a decorative band meaning the woven fabric and the pearled snood are not clearly joined and may be two separate pieces.
 

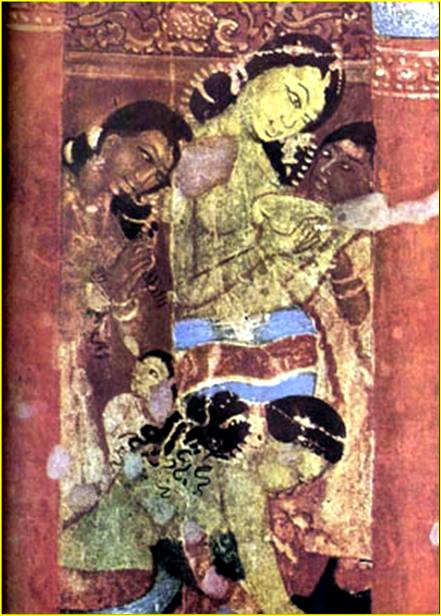
Figure 3: a) Old Man and Young Woman – detail (Lucas Cranach the Elder), b) Portrait of a Young Woman – detail (Lucas Cranach the Elder, 1530-1533), c) Portrait of a young woman – detail (Lucas Cranach the Elder, 1530), d) Ill-matched lovers (Lucas Cranach the Elder), e) Judith with the head of Holoferenes – detail (Lucas Cranach the Elder, 1530, Metropolitan museum of Art). f) Old man in love – detail (Lucas Cranach the Elder, 1537), g) Christinia Eulenau (Lucas Cranach the Elder, 1534), h) Ill matched lovers (Lucas Cranach the Elder), i) Judith with the head of Holofenes (Lucas Cranah the Elder), j) Feast of Herold (Lucas Cranach the Elder, 1531), k) Sampson and Delilah (Lucas Cranach the Elder, 1529-1530, Metropolitian Museum of Art)

Bands:
Most of Cranach’s women wear a version of a snood with a majority of them pearled or gemmed. Figure 3 shows examples of the different styles. 3a and 3c have a flat band with simple embroidery while 3b and 3d show a black ribbon or tie to secure the snood onto the head. As discussed earlier the lack of band in 3b may be due to the fact the snood net and the woven fabric underneath are separate items. In Figure 3d, the snood is not woven but rather a decorative brocade fabric. This may in fact be a bag of brocade tied onto the head with a black ribbon though it is difficult to find evidence of gathering along the bands on any of Cranach’s Ladies.
As my snood has a crocheted band which does not sit close to the skull (it’s stretched out a little) I will attached a band of cloth so it can be fastened on securely. This with have the added advantage that I can leave small gaps which will allow me to slide bobby pins between the layers of cloth and surreptiously secure the snood to my head.
Cranach’s Ladies had many different styles of snood band. Figure 3c and 3e show a common leafy embroidered pattern in black. Figure 3a and 3k have a chain pattern that is utilised in many paintings. The snood in Figure 3f has a Latin saying picked out in pearls while Figures 3g and 3j use pearls in a simple geometric design. I rather like this style so will use pearls and garnets to create a simple geometric pattern.

Decoration:
I have already decorated the net of the snood with pearls and garnets (Figure 4). There are multiple ways of decorating the net shown in Cranach’s paintings. Figure 3c shows pearl work at the junctions in the net while most of the others have a net made of pearls (Figure 3f and 3g) or what appears to be gold spangles (Figure 3j and 3k). Figure 3j also shows the junctions of the nets being decorated with gems in gold settings. As I do not have the money to afford to decorate every strand of the net with pearls I chose to highlight the junctions of the net. I wanted to use some garnets as well as the dress I plan on wearing this headwear with is a deep pink colour. These gems were sewn onto the snood using silk thread after the snood was constructed. Next time I might use a thinner thread to create the snood and drill out some of the pearls so they can be placed during construction.


Figure 4: The cream snood is decorated with alternating pearls and garnets. It stands out well against unbound red-hair.


To finish this project I need to line the snood with an orange or gold cloth. These will be sewn together both along the net and at the band. The band will be decorated in geometric designs using cream colored pearls and garnets.