
In the previous two posts I reviewed the hats of The Virtues with regards to the varied brim construction (split brim and floppy hats). There is significantly less material to work with on this topic as displaying the full crown of a wide brimmed hat often means obscuring the face of the wearer. Working within the limited confines of the The Virtues, I've attempted to propose some constructions methods to achieve the look on display. These are aimed to direct future experiments with cloth to determine how construction and use requirements (function) might dictate form.
The rest of the post is below the cut as it's picture heavy, again.
Round crown
 |
 |
Hat 21 - Simple split brim with round slashed crown.
There is only one clearly rounded crown in The Virtues. Hat 21 has a simple split brim topped by a round slashed crown. Close examination of the slashes (blue) indicates that unlike the slashed brims, this is a single layer of fabric cut in such a way as to form straight flaps. Additionally, the angle of the red slash indicates that the flaps tuck under themselves before they are attached to the brim. This suggests that the slashes have been used to remove sufficient fabric to reduce or negate gathering which would be required if the full circumference of the circle were retained.
Minor ridges (yellow) could suggest the crown is constructed of quarter circles or wedges. Quarter circles (or ovals) would have the benefit of being easier to cut out of a length of fabric. Using a pie wedge slightly less than 90 degrees would create a minor point at the peak of the hat. While there is a lump (button?) there, the overall look is flatter rather than pointy so the use of wedges to create a point is discounted. Seams created by using quarter circles would reinforce the crown of the hat which could be a deliberate addition. That said, by using quarter circles rather than a full, the seams joining the quarters would introduce 4 points of weakness once the flaps are cut. Construction and strength wise, this would add needless complications in the 21st century when fabric for hats is plentiful.

22 - Slashed crown pattern
I created a slashing pattern to replicate this hat with either 4 or 5 flaps per quarter. In drafting this pattern, I determined something interesting. If we assume the flaps provide a way of reducing bulk at the crown, we can propose that the outer circumference of the cut flaps is equal to the circumference of Beardy's head. As the carving shows straight edge flaps, the circumference of the crown is equal to the circumference of the inner circle of flaps (green circle).
 |
 |
23 - Probably not a round crown hat as there are hints of flat corners and minor peaks.
Parcel hats
I've termed this next style of hats "parcel hats", as they look like they've been constructed of filo pastry. I've chosen not to use the term "square hats" as this implies squares were utilised in the construction. This may not be the case in some of the hats and I believe there are multiple ways to achieve the same look.
None of the carvings in The Virtues indicate if the internal band of the crown is square, circle or oval. The different shapes will impact on how the hats display when worn. As someone with an oval head, if I wear a circular hat the edges are pulled unequally resulting in a pringle shaped brim. Due to the slashing and limitations of the stone medium, it's difficult to tell if this effect is occurring in The Virtues. A hat with an oval band would sit cleanly on my head creating a perfectly aligned brim. The brim deformation of a square internal band would be determined by the tension and elasticity of the wool as well as by how much the brim has been reinforced by. The shape of the internal crown will dictate how the crown is fastened to the brim and it's final shape.
 |
 |
24 - Parcel crown at half brim width.
Hat 24 is a good example of a basic parcel hat. It has four ridges along the crown (blue). The brim appears to be twice the size of the crown and is a diamond shape due to three slashes. The brim is a deformed triangle with three slashes at the corners. Damage to the brim suggests the hat was slightly larger but a small section has been broken off and the hat repaired.

25 - Parcel hat pattern
I have devised a method to reconstruct the parcel hat crown appearance. I have used a dark blue square to indicate the brim however this should follow split brim construction methods described in a previous post. This pattern assumes an internal crown that is oval or round. A square, the same diameter as the brim, is fastened to the internal crown and the excess fabric removed. The corners of the square are brought to the center and sewed together to create a parcel shape. This creates a final crown diameter equal to the brim radius
 |
 |
26 - Parcel hat with raised seams
The angle Hat 26 is carved on helps show a section of the crown (red & yellow) arcing up to meet the quarter seams (blue). This shape can be created in a number of ways. If the crown cutout is almost as big as the final parcel size, the sides of the parcel will raise when worn creating the curve seen. I've called this the swelled head shape. The easiest way to achieve this is to increase the size of crown with relation to the crown and brim.
In The Virtues, the brim radius is somewhat larger than the final crown diameter. This indicates that the initial square used to create this hat is smaller than the brim. The length of the initial crown square must be close to twice the diameter of the crown cutout. So, less an indication of a swelled head and more of an indication of limited fabric.
It is possible also to create this shape with a square crown the same size as used to make Hat 24 (i.e. length more than two times the diameter of the crown cutout) and maintain a wide brim relative to head size. To make the crown a dumpling shape, all that's required is to consume more fabric in the top seams. This pinches the corners of the hat together raising them off the brim. This shape doesn't require the size of the head hole to increase relative to the crown. Importantly, it suggests that hat required additional seam width/strength. This may be a requirement to protect against hard use, or it may because the fabric frays significantly thus requiring more fabric to be consumed in a seam.
 |
 |
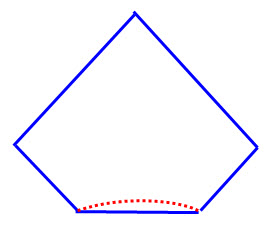
27 - Parcel hat with square edges.
Hat 27 shows a parcel hat with very square edges. The cross seams (yellow) appear to curl down to meet the brim. There are multiple ways to achieve this look. One possibility is that the hat has no depth to the crown and the parcel itself is purely decorative. In this case, four triangles can be sewn together then fixed to the center of the hat to present this look. This method could be used to achieve any crown flat shape so is dismissed from future speculation.
 |  |  |
28 - Patterns for swelled head, square crown cutout and reinforced crown hats.

29 - Triangle strip pattern for parcel hat
 |
 |
 |
30 - Potential origami hat
Hat 30 shows a split brim (blue) with a flattened square crown (red). Two ridges are visible leaving the points of the crown. This suggests a couple of construction possibilities. As we can't see if there are seams on the top of the crown, we could assume that the square is made of four squat pentagons. These can be sewn together to create seams on the top and the bottom of the hat. This idea is an extension of the tiny houses pattern and would use minimal fabric. To sew to a circular internal crown, a slight curve would be required for the base of the pentagons (red dashed line).
Origami hat
Both of the hat types discussed so far are variations aimed at reducing the external perimeter to match the internal crown circumference. This is desirable because it results in a flat internal crown seam. If, instead, a bulky seam is acceptable there are a variety of ways to achieve this. Something similar to Hat 21 could be created by cutting lines instead of removing wedges. The triangular strips are then overlapped along the internal crown and the puff effect is achieved. This is unlikely given the visual lack of overlap.
Hat 30 appears to be a candidate for additional fabric along the internal crown line. Rather than seams, we could assume the yellow lines are folds. If this is the case, four simple clockwise folds to pinch the excess fabric down and around would square off the top of the crown. The square shape is unlikely to be maintained if the crown is pushed up by the wearers head so additional stitching would be required to ensure the folding. Though viable, I feel this approach would be inelegant and wouldn't provide any improvement over the other styles.
No comments:
Post a Comment