On Saturday I entered the Dr. Seuss plate and bowl into the Fields of Gold Arts and Sciences competition. I made several mistakes with my entry which I knew before I presented them but did it anyway.
Mistake 1 - I spent less than half the time I spent on the project, on the documentation. I was already presenting an A&S class on Indian Garb (cholis) and spent all available time collecting resources for it and writing documentation for Stuarts Bacon entry (which was harder than I thought).
Mistake 2 - I used wikipedia as one of my references. Yes, the teacher in me cringed as I carefully removed the hyperlinks BUT it said everything I needed it to say. I knew I had the information in one of my other books, at home, and I wasn't going to be returning to my house before the event. I considered not adding the quote, however it formed a nice introduction to the extant piece I was working from.
Mistake 3 - Assumed knowledge. I did something I do far too often and assumed that because I entered the competition last year and because I've written the same explanation for my process that a much more cut down version would work.
Mistake 4 - I enclosed a list of places where you can paint and fire your own ceramics without any explanation due to mistake 3. A random list does no one any good.
So, what follows is my documentation before I've fixed it up as well as the commentary I received. I will be posting amended documentation later this week once I've hunted down my sources. I might also put a # next to sections that I'll cut and paste into future documentation.
by Antoinette Travaillie

1400's Apothacary/Pharmacy Jars, tin glazed earthenware, Florence, Italy. Met Museum, Accession No. 46.85.11
"An albarello (plural: albarelli) is a type of maiolica earthenware jar, originally a medicinal jar designed to hold apothecaries'
ointments and dry drugs. The development of this type of pharmacy jar
had its roots in the Middle East during the time of the Islamic
conquests.
The etymology of the word is not clear. Some scholars consider the Latin word "albaris" with the meaning of "whitish" while others criticize this interpretation as such recipients were originally manufactured in wood.
Parchment was white, or bleached white, so that the contents of the jar
could be written upon it. The parchment would overlap the upper half of
the jar in order to be affixed with a cord and properly seal the
contents.Brought to Italy by Hispano-Moresque traders, the earliest Italian examples were produced in Florence in the 15th century. Albarelli were made in Italy from the first half of the 15th century through to the late 18th century and beyond. Based on Persian designs said to emulate bamboo (the traditional manufacturing material), the jars are usually cylindrical with a slightly concave waist. Variations in size and style can be seen from region to region, ranging from 10 cm to 40 cm in height. Such jars served both functional and decorative purposes in traditional apothecaries and pharmacies, and represented status and wealth. The jars were generally sealed with a piece of parchment or leather tied with a piece of cord." (Quoted from Wikipedia)
I found the pharmacy jar while trolling through someones Italian Ceramic board on Pinterest. I fell in love with it. I quite like the dark blue on white in ceramics and this fish looked so Dr. Seuss I just had to use the design elements in a project. I like to make ceramics people in the SCA can actively use at events so I decided to make a plate and bowl set
At the time, the apothecary jars were produced, Italian ceramic plates and bowls were moving into the majolica design style which involves an intricate use of colours and geometrical shapes (figure 2). There were many workshops with Italy producing ceramics which were exported throughout Europe.
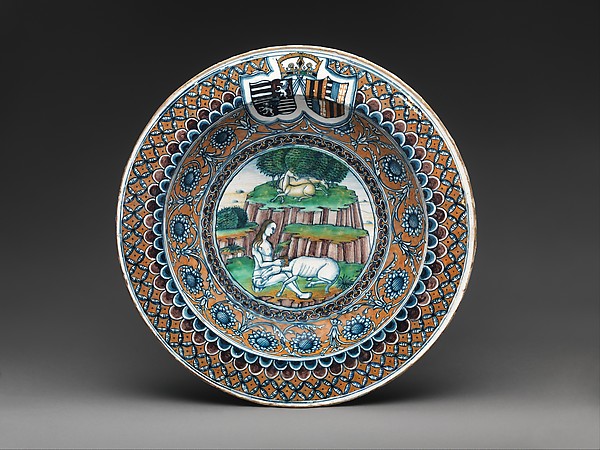
Figure 2: Dish depicting a virgin and a Unicorn. Tin-glazed earthenware. Italian.1486-1489. Met Museum of Art. Accession number 46.85.30
Method:
Glaze - Tin-glazed earthenware is potter which is coated in a glaze containing tin oxide which leaves an opaque white base on which metallic oxides are painted. As I wished to create items that would be food safe I have decided to use commercial bisque (pottery after the initial firing to harden it) made using white clay. I painted the design in underglaze and applied a clear coat of glaze over the top to make the white ceramic shine as if it were tin-glazed.
Shape - The commercial bisque I selected for this project were as close to the shape of extant objects (Figure 2) as I could acquire. The bowl has slightly steeper sides than the one depicted above. This has the added benefit that it can accomodate the more liquid soups or smaller portions that are often eaten at SCA events.
The Process - I started by making the bowl as close to the original design elements because it was smaller and easier to handle while glazing. Originally I was going to have the same design on both items (below) and just change up the rim decoration but the curved sides of the bowl made that too difficult. As a result the bowl is very close to true-to-reference, design wise.
Once I'd finished the bowl, I decided to change the design for the plate rather than have it perfectly matching. Due to the difference in curves and size I could make it close to my original design sketch (Figure 3).
Each item was glazed in a staged process: the main elements were outlined then the central background fill was completed. The main elements were then covered with a 1part glaze, 3 parts water wash. This is a new process for me which I hoped would create some shading in the glaze similar to what can be seen on the original piece. As the glaze turns opaque before firing, it is really difficult to see how much coverage the final product will have. After completing the center of the piece, I worked on the back. The whole back is glazed before the rim of the front is completed. This prevents the front design (the most important part) from rubbing off while the back is being completed. It is less improtant if the back of the design loses colour depth due to unintentional rubbing.

Once I'd finished the bowl, I decided to make a matching plate. Due to
the difference in curves and size I could actually go with the original
plan. I sort of photo documented the stages as I was posting the updates
on Faceplant as I went.

Outline of the fish.

Background fill complete

Main elements washed with 1 part glaze, 3 parts water was

Centre motif and fill completed on back of plate

Back rim is completed with two lines of floral pattern taken from the
rim of the apothecary jar. Inner ring is the upper rim of jar, outer
ring is the almost flat ring near the top of the jar.

Front rim is completed with a similar pattern to the back and to the bowl
For a list of places to paint ceramics such as this please follow this link.
Your painting is wonderful - good use of space & reflects the finer elements of the original. With the doco: what is the list of businesses supposed to be telling me? Is there more you can tell me about the fashion for blue paint on white ceramic? - Crispin
ReplyDeleteI love the playful nature of the images and your painting is very good. I love them alot, however Wikipedia is not a valid source reference as it is possible for anyone to write stuff on it and quote themelves - I know you didn't do. You do need to put a proper biblipography in rahter than links to businesses.
ReplyDeleteYour historical doco was good as far as it went but I would have liked to see an example of the monochrome dinnerware as well as the very different polychrome. I would also like to have seen a comment about what you weren't happy with in the firing. What you did was great it just needed tweaking in the doco - Monique de La Maison Rouge.